Exporting Orders for QuickBooks Online
Local Line has developed an order export format that is specifically designed for importing orders as invoices into QuickBooks Online. This can be found in your Local Line back office in the Orders list, by clicking "Export" at the top, and then choosing "Orders list (for QuickBooks Online)" from the type dropdown: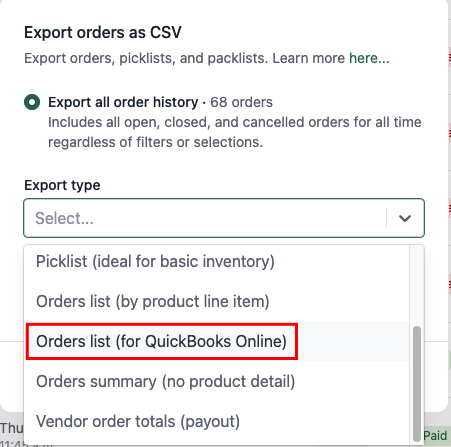
It's recommended to filter your orders first (e.g. by date range) or use the checkboxes to manually select some orders before clicking Export, and then only export the filtered or selected orders (QuickBooks has a limit of 100 invoices per import). For example you may want to export your orders at the end of the week or month once they have all been finalized and you are ready to invoice your customers. Keep in mind that there is no sync between the two systems, so any edits made in Local Line after exporting will not be reflected in QuickBooks (or vice versa). Waiting until orders have been finalized will reduce the amount of manual updating, although invoices can be deleted in QuickBooks and then re-imported if needed.
Please be aware of the following limitations:
- The export has not been tested with the desktop version of QuickBooks, only QuickBooks Online. All references to "QuickBooks" here refers to QuickBooks Online
- QuickBooks' import template doesn’t support shipping information (address, fulfillment method, date, fees)
- Only invoices are supported (not sales receipts). Most payment information cannot be imported with an invoice, only due date. If payments are being handled outside of QuickBooks, they will need to be manually entered and applied in QuickBooks
- Multiple or custom tax rates would require manual editing of the export in order to enable mapping to the correct rates in QuickBooks. Additionally, any manual changes to the taxes in Local Line may cause inconsistencies after the import (e.g. if your sales tax rate in Local Line is set to 6% but the rate you have configured in QuickBooks is 9.5%, after importing your totals may not match, or you may encounter QuickBooks validation errors). Ensure your tax setup in QuickBooks matches what you are charging in Local Line
- Due date is a required field in QuickBooks -- on the export this is set as the payment due date from Local Line. If you have not set a payment due date on the order in Local Line, the field on the export will be blank and this will cause an error when importing into QuickBooks
- It is not possible to import invoice discounts in QuickBooks -- if you have applied an order-level discount in Local Line, you will need to manually apply this in QuickBooks after importing
- It is not possible to import fulfillment fees in QuickBooks -- if you are applying a fee for pickup or delivery in Local Line, this will need to be manually entered in QuickBooks after importing
- QuickBooks does not support payment fees, you will need to manually enter this as a line item in QuickBooks after importing
- QuickBooks doesn't support “packages” (aka product variants). The export combines the product name with the package name to create a unique product for each combination (e.g. “Potatoes - 3lb bag”, “Potatoes - 5lb bag”, “Potatoes - 10lb bag”). During import if a matching product is found in QuickBooks it will be associated, otherwise a new product is created (if the option was checked)
- You can import a maximum of 100 invoices at a time with a 1,000 row limit per file
Note on taxes:
If you are charging sales tax, you must first enable this in QuickBooks, and then when importing you can map the “yes” and “no” values from the export to your corresponding tax rates in QuickBooks (e.g. “HST ON” and “Exempt”). Local Line cannot provide tax guidance, you should always consult with a tax expert in your local jurisdiction to ensure you are complying with tax regulations.
We recommend reading through QuickBooks' knowledgebase article on importing invoices to familiarize yourself with additional details (most of the below information and steps are also in QuickBooks' article):
If you wish to use the Local Line order number as the invoice number in QuickBooks (recommended), you must turn on custom invoice numbering in QuickBooks' settings. This is found in Settings -> Account and Settings -> Sales: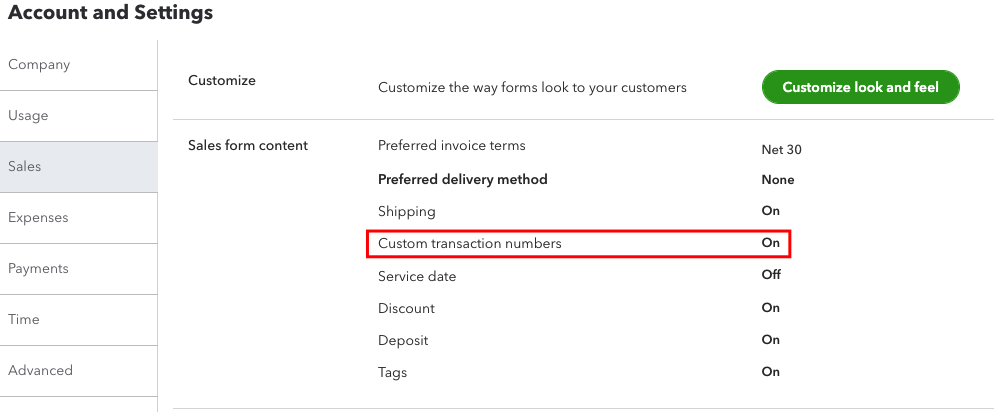
When importing the file into QuickBooks, here are the steps to follow --
- At the first step of the import, click "Browse" and locate the export file. Check the boxes for “Add new contacts” and “Add new products/services” for convenience – this saves the effort of creating or importing all your customers and products in QuickBooks in advance. For customers however, you may still want to import them separately in advance, as more details can be imported (e.g. phone number, email address). During invoice import, only customer display name will be set for new customers. If you do not check these boxes and QuickBooks can't match to an existing customer or product, the import will fail. Click the "Next" button
- In the next step you will map the columns from the export to fields in QuickBooks. For most of them, the column headers are the same as the fields names in QuickBooks to make things easy and some will be automatically selected, however you will need to manually adjust a few options:
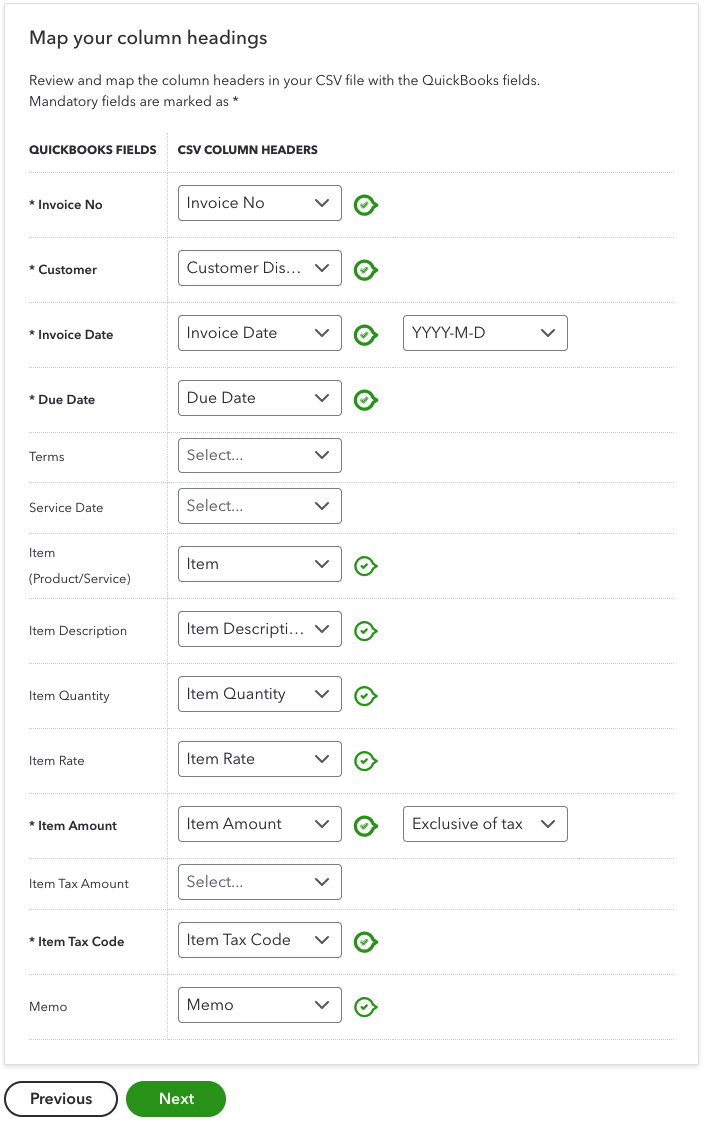
- Customer: There are three columns you can choose from for your customer name, depending on preference and how your data is entered in Local Line. Because it's a required field in QuickBooks, in most cases you will want to use "Customer Display Name". It will be one of: company name, [first name] [last name], or email address, in descending order, depending on what is available for the customer in Local Line. The "Customer" column will always be "[First name] [Last name]" and the "Company" column will always be the company name, however because these fields are optional in Local Line, they may be blank in the export and QuickBooks will generate an error. The safest choice is "Customer Display Name" unless you have a specific reason to choose one of the others and you have checked to ensure there are no blanks in your export
- Invoice Date format: Choose “YYYY-M-D”
- Item (Product/Service): Choose "Item" (this is the price list product category from Local Line)
- Item Description: Choose "Item Description" (this is "[Product Name] - [Package Name]" from Local Line
- Item Quantity: Choose "Item Quantity"
- Item Rate: Choose "Item Rate"
- Item Amount: Choose "Item Amount", then “Exclusive of tax” or “Inclusive of tax” depending on how you are charging for tax in Local Line. For most sellers this will be “exclusive of tax” if your prices do not include taxes
- Item Tax Code: Choose "Item Tax Code"
Once all of the fields have been mapped, click "Next". If you have taxes enabled in QuickBooks, you will then need to map the "Y" and "N" tax codes ("taxed" or "not taxed") to the tax codes you have set up. These codes are specific to your tax jurisdiction so will likely be different from the screenshot:
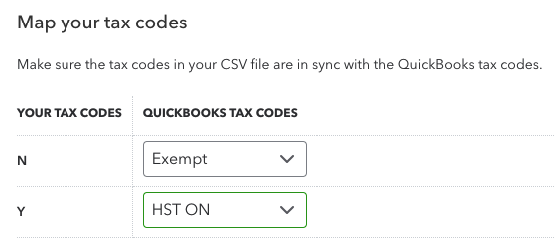
If you use multiple tax rates in Local Line and have modified the export as mentioned above, you can map each of the codes you've used to the correct code in QuickBooks. Click "Next" to continue and QuickBooks will show a summary of the information that will be imported, including the number of new invoices, customers and products that will be imported. Ensure the information looks correct and click "Start import".
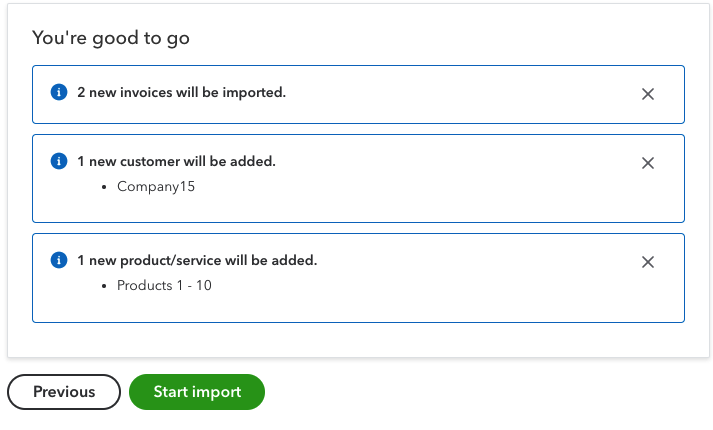
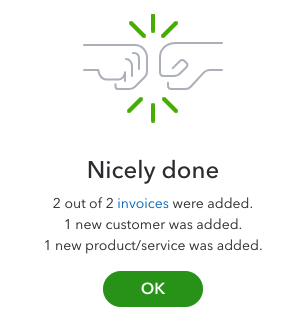
After processing the file, you'll receive a report of the results. Any errors will be reported so that you can correct them and try again if necessary.
If you have questions about how to handle invoices and other data in QuickBooks, or general questions about QuickBooks, reaching out to QuickBooks' support team is your best option. If you notice errors or inconsistencies with the exported CSV file, please contact Local Line support (support@localline.ca) and include the file so we can help!