- Add Products Individually
-
- Add a new item (base) unit
- Bulk import from a file to create or update products
- Availability table
- Pricing and packages table
The Products table is where you add and manage your products, and makes it easy to update inventory and visibility directly in the table, and also filter, select, and update products in bulk. It also contains a product attributes column which gives you these product details at a glance:
 |
Orders containing this product will require review and approval (e.g. if you need to weigh the product and update the order before collecting payment), and payment will not be captured at the time of order. |
 |
This product has been shared with you by one of your connected vendors |
 |
You are sharing this product with one of your connected hubs |
 |
Subscription options have been enabled for this product |
| This product is part of a Box |
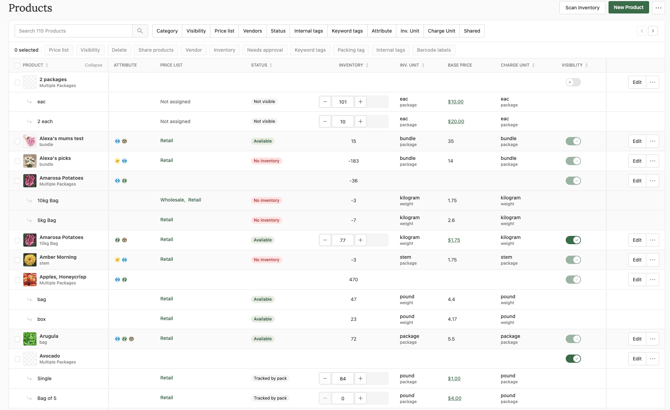
The table displays an overview of your products with their inventory and package pricing and makes it easy to update both directly in the table.
Use the table search and filters for easy navigation (note: the search box will only match on product name).
If a product only has a single package, the inventory, unit and pricing will all be shown on a single row. If a product has multiple packages, each package will be shown on its own row with the corresponding details. If you are tracking inventory on the product, you will either see the inventory controls on the parent product's row if the packages are sharing inventory, or on each package row if you are using separate package inventory (note that shared products will display inventory, but you will not be able to update the values).
You can collapse all products down to a single row for a more streamlined view by clicking Collapse in the Product column header, and expand them again by clicking Expand:
Expanded View: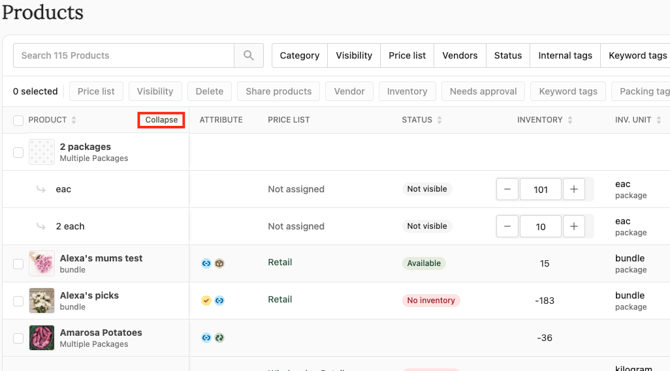
Collapsed View: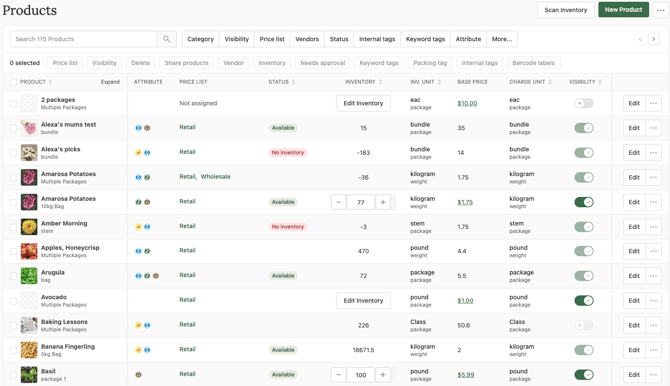
Note that in the collapsed view, individual package inventory is not displayed, but you can still adjust it by clicking the Edit Inventory button on the product:
Add products
There are two ways to add your products: You can add them individually, or bulk import them from a CSV file. If the bulk import method is used and you want to display product images on your storefront, you will need to add the image(s) to each product after the import is complete.
Add products individually
- Go to the Products page.
- Click + New Product.
- In the Product info section:
- [Required] Enter a Name.
- [Optional] Enter the Vendor if you are a hub.
- Enter Keyword tags. These tags are displayed below product titles on your storefront. Type the keyword tag then click Create “keyword tag name” to save the tag.
- Enter a Description. You can make text bold, italic or underlined, and add lists, hyperlinks and emojis.
- In the Images section, drag and drop an image or click Add images to select the image file. Square images that are small in size work best and limit the loading time of your images on your storefront. If you need to resize an image, use a web search to find a method for the device you prefer to use. For example, your iPhone or your Windows PC.

- In the Track Inventory section:
- If you do not want to track inventory, click the toggle to disable it
- Specify how you want to track and charge for the product:
- Track and charge by package
- Track and charge by weight
- Track by package and charge by weight
- Track by weight and charge by package
- Use this best practice guide for managing inventory
- For a detailed guide on inventory settings, please see Product Inventory Settings
- If you want to add multiple package sizes for a product, click Add new package in the Packages section then specify the Package name, # of items (number of base units in the package) and the package Package price. You can reorder packages by dragging and dropping the left-side handles.
-
- Click the checkbox next to the price list you want to assign the product to.
- Select the category from the dropdown menu.
- If you want to apply a price adjustment to the product packages, click the toggle to enable the price adjustment controls.
- Click the type of price adjustment: Set, $, %.
- Set - Manually enter a new price.
- $ - Specify a dollar amount to add or deduct from the base price.
- % - Specify a percentage value to add or deduct from the base price.
- Enter the updated value. To apply a discount using the $ and % methods, precede the value with a minus sign (-).The Price list options section can be skipped if you prefer to assign your products in bulk to your price list categories when you build your price list. See Add a price list in 2.0 for more details. If you prefer to assign your products to a price list category individually, you must first add a price list and then create your price list categories before you can complete this section and proceed to step 8. Your products are not displayed on your storefront if you do not categorize them.
- Click the Taxable toggle to enable tax if applicable. Then choose either Automatic or Static tax rates. Most users will want to use the automatic setting, but if you need to set a specific tax rate for only this product, you can choose the Static option and set the rate here. See How tax rate is determined for products marked taxable for more details.
- In the Back office details section:
- You can add an Internal product ID if you have one.
- You can also add Internal tags that are used as filters on your Products page table. Type the tag name then click Create “internal tag name” to save the tag.
- In the Product status section:
- If you do not want the product to be visible on your storefront, click the toggle to hide it. No products are visible on your storefront until you open your store.
- If you want to prevent your customer from paying until after you have reviewed the order for things like the final weight of an item, or a volume discount, you can enable the Orders with this product require approval feature. When your customer places an order for a product requiring approval they are informed at checkout that payment will be processed when the final amount is known. Orders that require approval are flagged on your Orders page table with a yellow checkmark icon.
Important Note: If an order contains at least one product that requires approval, a payment method must be selected at checkout, even if the balance owing is $0. This is so there is a payment method available to cover any additional balance as a result of adjusting product weights. So even if the order total is $0 or the customer is using store credit to cover the order, they will still be prompted to select a payment method.
- Click Save.
- You can add subsequent products more quickly by duplicating a product.
Bulk import from a file to create or update products
You can import up to 1000 products from a csv file
- Go to the Products page.
- Click the dot menu in the top right.
- Click Import products.
- Click Download this template.
- Add product details to the template file and save it. Required fields are highlighted in green in the import file.
- Local Line product ID - This ID is automatically generated at upload and is not displayed in your back office. Leave it blank when creating a new product.
- [Optional] Internal ID - If you have an internal reference for the product specify it here. After upload, this is displayed in the product's Back office details as the Internal product ID.
- [Required] Product - Specify a name for the product. After upload, this is displayed in your back office Products page table as Product.
- If you specify the same product name in multiple rows, packages are added to the product at upload along with any package details you specify.
- [Optional] Track inventory by - To track the product by Item, enter "item". To track the product by Weight, enter "weight". If you leave the field blank, the product is set to track by Item. You cannot change this setting after upload but if needed you can instead duplicate the product to do so. After upload, this is displayed in the product's settings as Track inventory by.
- [Required] Item unit - Specify the Item unit, or Weight unit if you chose to track by "weight" in step 4. You cannot change this setting after upload but if needed you can instead duplicate the product to do so. After upload, this is displayed in your back office Products page table as Unit.
- [Optional] Charge by - To charge by Item, enter "item". To track the product by Weight, enter "weight". If you leave the field blank, the product is set to track by Item. After upload, this is displayed in the product's settings as Charge by.
- [Optional] Charge unit - If your Charge unit is different than your Item unit, specify the Charge unit. Otherwise, it will apply the Item unit you specified in step 5. You cannot change this setting after upload but if needed you can instead duplicate the product to do so. After upload, this is displayed in the product's settings as a secondary Item/Weight unit.
- [Optional] Track inventory - To track inventory, enter "true". If you leave the field blank, the product is not set to track inventory, e.g. "false". After upload, this is displayed in the product's Track inventory settings.
- [Optional] Inventory - Enter a numerical value for the amount of inventory you have of the product. After upload, this is displayed in the product's Track inventory settings.
- [Optional] Notify when inventory reaches - To be notified by email when inventory reaches a certain level, enter the numerical value for that level. If you leave the field blank, no notification is sent. After upload, this is displayed in the product's Track inventory settings.
- [Optional] Sold out notification - To be notified by email when the product runs out of inventory, enter "true". If you leave the field blank, no notification is sent. After upload, this is displayed in the product's Track inventory settings.
- [Optional] Visible - By default, the product visibility is set to "true" so that it is displayed in your storefront. Enter "false" if you do not want to display the product in your storefront. After upload, this is displayed in the product's Product status settings.
- [Optional] Description - Enter a product description to help your customers learn about the product. After upload, this is displayed in the product's Product info settings.
- Package ID - This ID is automatically generated at upload and is not displayed in your back office. Leave it blank when creating a new product.
- [Required] Package name - Specify a name for the package. After upload, this is displayed in the product's Packages settings.
- [Required] Avg package weight - This field is only required if you are tracking inventory or charging inventory by weight. Enter the average package weight for the package. After upload, this is displayed in the product's Packages settings.
- [Required] # of items - This field is only required if you are tracking inventory by item. Enter the number of packages you have for the product. After upload, this is displayed in the product's Packages settings.
- [Required] Unit price - Enter a price for the package unit. After upload, this is displayed in the product's Packages settings.
- Save the import file.
- In your Local Line account, click Choose file.
- Click Upload.
- [Optional] Add product images. You can add up to 5 images per product and customize the order in which they display on your storefront.
If there are problems with your import an on-screen modal is displayed that specifies the problem with the import. Address the problem in the import file and try to upload again.
Edit a product
You can also edit your price list categories from the product detail view.
If you change a product name, past orders retain the product name that was in effect when the order was placed.
- On the Products page, click the dot menu for a product.
- Click Edit product.
- Make the needed changes.
- For example, if you want to a hide a product that is currently in a price list and visible on your storefront, click the toggle in the Product status section next to Product visibility.
- Click Save.
Duplicate a product
- On the Products page, click the dot menu for a product.
- Click Duplicate product.
- Modify the necessary fields.
- Click Save.
Delete a product
Deleting a product removes it from your Products page and storefront, but the product remains in historical orders and reporting.
- On the Products page, click the dot menu for a product.
- Click Delete product.
- Click Delete.
- Click Save.
Products bulk actions
You can make changes to individual products and packages directly in the table, as well as apply changes to products in bulk.
Availability table
You can edit the inventory quantity and visibility status directly in the table.
- Use the controls in the table to edit inventory quantity:
- Use Set to enter a price manually.
- Use + to specify a quantity to increase the existing quantity by.
- Use - to specify a quantity to decrease the existing quantity by.
- Click the Visibility toggle to make a product visible or invisible in the price lists it is assigned to.
You can make the following changes to products in bulk:

- Check the box in the column header to select all products on this page or manually select the products you want to change
- Click the action you want to take:
- Price list: Assign all packages of the select products to one or more price lists. You can also choose which category you want to add them to
- Visibility: Make this product visible on not visible in your storefront (this will also affect products you are sharing with a hub)
- Delete: Delete the selected products and its packages
- Share products: Share (or unshare) the selected products with one of your connected hubs. You can select the hub, and also apply a price adjustment
- Vendor: Assign the selected products to one of your Managed or Connected vendors
- Inventory - Use the controls to edit inventory quantity:
- Use Set to enter a specific inventory value
- Use + to specify a quantity to increase inventory by
- Use - to specify a quantity to decrease inventory by (this will overdraw inventory into the negative if the current inventory is less than the value entered)
- Click Save
- Needs approval: enable or disable the Orders with this product need approval setting
- Keyword tags (storefront): Add or remove tags from selected products. If you want to Add, select an existing tag from the dropdown, or start typing a new tag name in the box and click Create “tag name” to create the new tag and click Save. If you want to Remove, select an existing tag from the dropdown menu and click Save
- Packing tag: Add or remove packing tags from selected products. If you want to Add, select an existing tag from the dropdown, or start typing a new tag name in the box and click Create “tag name” to create the new tag and click Save. To Remove, select an existing tag from the dropdown menu and click Save
- Internal tags (back office): Add or remove back office tags from selected products. If you want to Add, select an existing tag from the dropdown, or start typing a new tag name in the box and click Create “tag name” to create the new tag and click Save. To Remove, select an existing tag from the dropdown menu and click Save
- Barcode labels: Generate a printable PDF with barcodes for the selected product packages. Note that only packages with a package code will have barcodes generated. You can choose how many of each barcode label to create, and the format/label type for the output file
Export products
When you export your products, you can choose to export all your products, or just a selection based on applied filters or selection.
To export your products to a file:
- Click overflow dot menu in the top right
- Click Export products
- If you have applied a filter to your Products table or manually selected one or more products, you can choose to export only the filtered or selected products, or all your products:

- Click Download to download a CSV file containing your chosen product data
Configure inventory settings for variable weight products
See How to sell products by weight using Local Line 2.0 for best practices.
If you sell variable weight products you can specify how you want to track that inventory and charge for those products.
- Go to the Products page.
- Click the dot menu for a product.
- Click Edit product.
- In the Inventory tracking section, specify your preference:
-
- Track by item & charge by item
- Track by weight & charge by weight
- Track by item & charge by weight
- Track by weight & charge by item
You can enable the Orders with this product need approval feature if you want to prevent your customer from paying for their order until after you have finalized and approved it (e.g. product quantity, weight).
When your customer places an order for a product that needs approval and they select a credit card payment method, an on-screen message explains that their card is only authorized and that final payment will be processed after you approve the order.
If they have selected a custom payment method, an on-screen message explains that payment will be requested after the order is approved. Orders that need approval are flagged on your Orders page table with an ![]() orange exclamation point icon. See Manage orders in 2.0 for more details on the "needs approval" workflow.
orange exclamation point icon. See Manage orders in 2.0 for more details on the "needs approval" workflow.
- Go to the Products page.
- Click the dot menu for a product.
- Click Edit product.
- In the Product status section, click the toggle to enable Orders with this product need approval.
Add product tags
You can assign different types of tags to your products to organize and administer your products:
- Keyword tags: These tags appear below product titles in the storefront list view, and on the product detail page. They also appear as filters in your storefront that customers can use to find products more easily.
- Internal tags: You can filter by these tags using the controls in your products table. These tags only appear in your back office.
- Packing tags: Packing tags allow you to define how products will be grouped on packing slips and pack lists. For example, if you have a group of products that are kept in cold storage , you can add a "refrigerated" tag so these will all appear together on a pack list to avoid having to go back and forth between storage areas to retrieve products.
- Go to the Products page
- Click the product name, or the Edit button on the product row in the table
- In the Product info section, start typing the tag name in the Keyword tags box then click Create “tag name” to save the tag
- In the Backoffice details section, start typing the tag name in one of the tag input fields, then click Create “tag name” to save the tag
Edit product tags
- Go to the Products page
- Click the product name, or the Edit button on the product row in the table
- In the corresponding section, click the Manage Tags button
- Click the pencil icon for the tag you want to edit, make the needed changes or click Delete tag to remove it.
- Click Save
- Click Close
Separate Inventory Per Package
When creating a new product, you have the option of choosing between separate inventory or shared inventory for the packages of that product. Choosing separate inventory allows you to manage a different inventory pool for each package, instead of a shared inventory pool for all packages.
Why Use This Feature?
This feature is useful if your packages are pre-packed, or you want to group different variations of a product under a single product tile on your storefront. It's an excellent way to handle different sizes or colors for non-food items such as t-shirts!
Example: You sell garlic in large, medium, and small bags that are pre-packed. Instead of deducting inventory from a shared pool, each size can now have its own unique inventory value to accurately reflect how many of each you have on-hand.
Key Benefits:
- Inventory is managed per package with separate inventory pools instead of per product with a shared inventory pool
- All existing Track and Charge By options are fully compatible
- When a package is added to an order, it draws from its own inventory pool instead of a shared one at the product level
- Packages are displayed under a single product on your storefront
How to Create a Product with Separate Inventory Per Package
⚠️ Important: This setting cannot be updated on existing products. This restriction ensures consistency for historical data in exports, reports, needs approval orders, and subscription orders. However, existing products can be duplicated, and the settings can be changed on the duplicate product. You can then hide or delete the original product.
- Create a new product or duplicate an existing product
- In the Inventory section, you will see two radio button options:
- Packages have separate inventory (default) → Each package has its own inventory pool
- Packages share inventory → All packages draw from a single shared pool
- Define your Track and Charge By settings and units. *All packages must still share the same track and charge by settings.
- Inventory is now managed in the Packages section, where you will enter inventory values per package.
How to Update Inventory for Products with Separate Inventory Per Package
You can modify inventory values in two places:
- When editing a product: Adjust values in the Package Inventory input in the Packages section
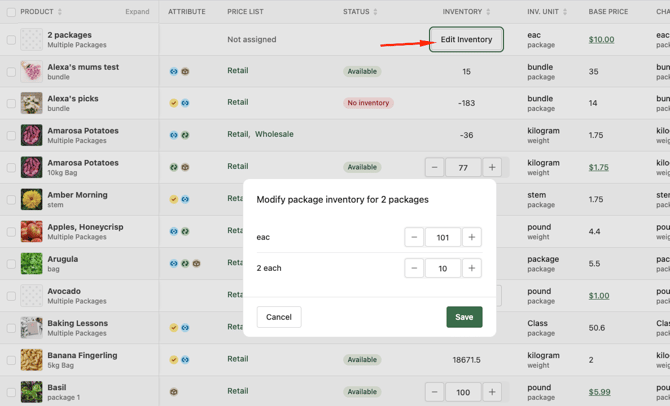
- On the Products Table:
- Click Edit Inventory on the product line in the table to open a modal
- Modify package inventory using the quantity adjusters or input box
Export Implications
This feature only affects the Products Export:
- Inventory for these products will be shown in the Availability sheet
- Instead, inventory will be displayed in the Packages & Pricing sheet of the export
Import Implications
The ability to import products with the option to track separate inventory per package is not currently available.
Product reporting
You can view and download key metrics about your product sales from the Products tab on the Reports page. Learn more about Reports.
Changing Storefront Product Ordering
The ordering of products in your storefront is set per category at the price list level. See the section in the Price Lists knowledgebase article for more information.