
Connect your online payment gateways and define your own custom payment methods.
- Users migrated from 1.0
- New Local Line users
- Connect an online payment gateway (Square, Stripe)
- Define a custom offline payment method (e-transfer, cash, etc.)
Assign a payment method to a price list in 2.0
Delete a payment method in 2.0
Override the default product tax rate in 2.0
Create a coupon code in 2.0
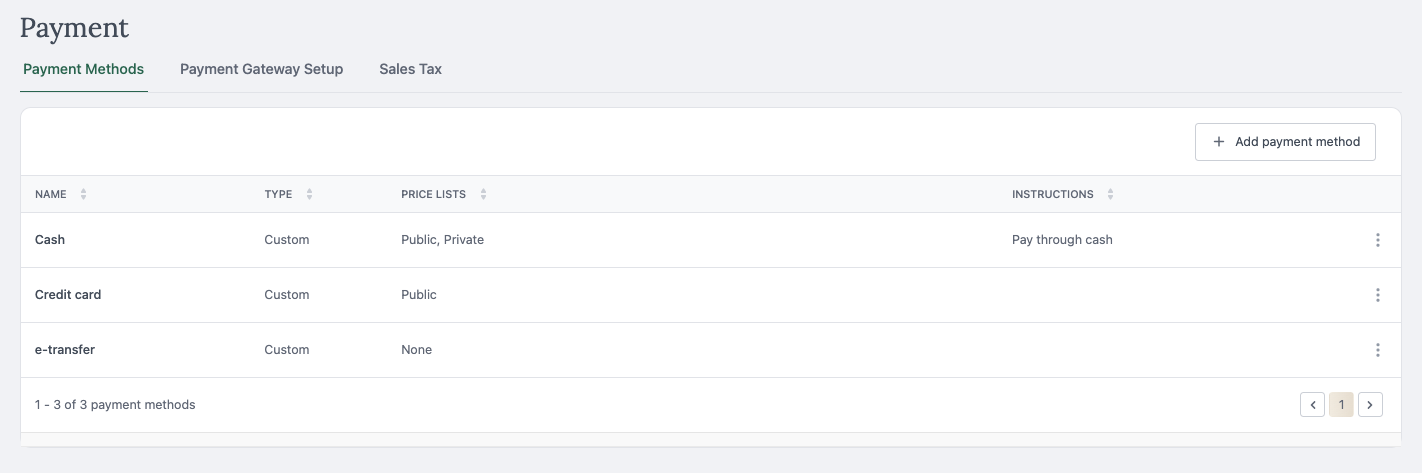
The Payments page is where you add and manage your online and offline payment methods, and where you can specify a product tax rate override if the default one isn’t applicable.
All subscription plans let you connect an online payment gateway like Square or Stripe, but custom offline payment methods are only available to Core, Premium and Ultimate plans.
Payment methods are not migrated from Local Line 1.0 accounts automatically and need to be added manually to your 2.0 account.
For more details on payment statuses, see Manage orders in 2.0.
Add a payment method in 2.0
Users migrated from 1.0
Your payment methods are automatically migrated from your 1.0 account to your 2.0 account, including your connected payment gateways (Stripe or Square).
New Local Line users
You can let your customers pay later (after checkout) for any payment method you create by applying payment terms to the payment method in your price list settings. Payment terms can be unique by payment method and by price list. See Manage price lists in 2.0 for more details.
Payment methods are displayed based on this logic:
- Back office - listed alphabetically by name, A-Z
- Storefront - displayed in the order you added them in your back office
- Go to the Payment page.
- If you want to add an online payment gateway, go to the Payment gateway setup tab. When you connect a payment gateway, you can accept credit card payments including Visa debit cards.
- Click Connect for the provider you work with.
- If you want to use LocalPay, and save on processing costs, click Connect LocalPay
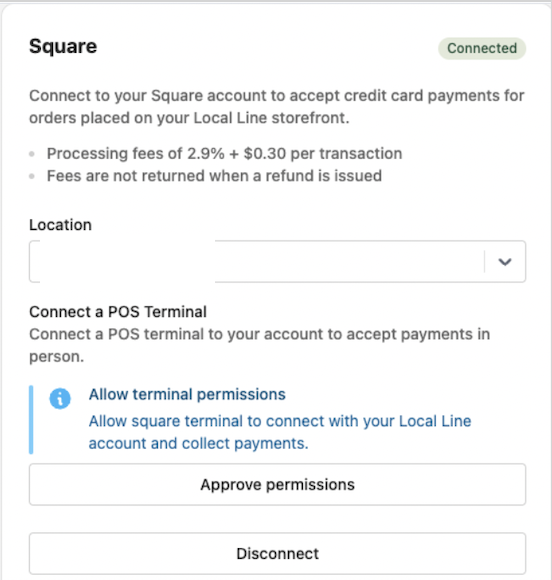
- If you want to use Square, click Connect Square.
- Click Connect. This redirects you to your Square account sign in page.
- After signing into your Square account, click Allow.
- In your Local Line account, select a Location. Locations are set up in your Square account. For example, you might have a Location for “Local Line checkout”.
- Your Square account is connected when you see the Disconnect button in your Local Line account.
- Complete step 3 to display your payment gateway method at checkout.
- If you want to use Stripe, click Connect Stripe.
- Click Connect. This redirects you to your Stripe account sign in page.
- Aftering signing into your Stripe account, click Connect.
- Your Stripe account is connected when you see the Disconnect button in your Local Line account.
- Complete step 3 to display your payment gateway method at checkout.
- Click Connect for the provider you work with.
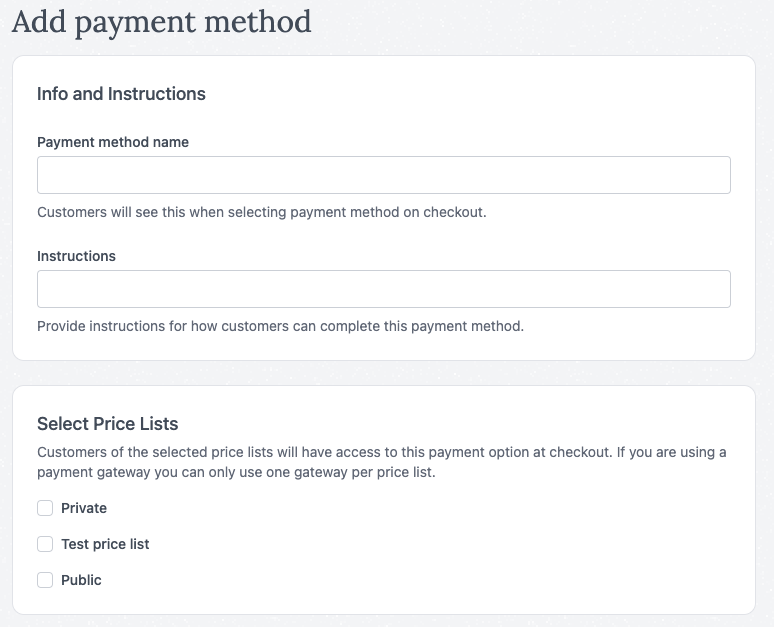
- If you want to add an offline payment method like cash or e-transfer, go to the Payment methods tab.
- Click +Add payment method.
- Enter a Payment method name.
- Enter the Instructions for using that method. You can make text bold, italic or underlined, and add lists, hyperlinks and emojis.
- The Select price list section can be skipped. Your payment methods can be assigned to your price list when you build your price list. See Build a price list in 2.0 for more details.
- Click Save.
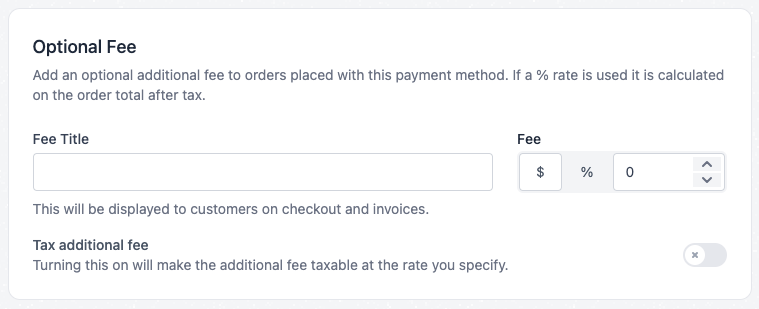
- [Optional] Add a custom fee to your payment method.
- In Fee title, give the fee a name.
- Use the Fee controls to specify whether the fee is:
- A $ amount
- A % percentage
- If you want to tax the added fee, in the Tax additional fee section, click the toggle to enable it.
- Specify the tax rate % you want to apply.
Payment terms for custom offline payment methods are managed in price list settings.
Connect Square Terminal for order payment
Access Permissions:
-
If you haven't yet connected to Square, you need to allow terminal permissions.
-
The process will redirect to the Square login page, after which you will return to the app.
Initiate Terminal Connection:
-
Click on Connect to POS Terminal.
Name and Location:
-
Provide a terminal name.
-
Select the location from the dropdown menu.
Generate Device Code:
-
Press Continue to generate a device code.
Enter Device Code on Terminal:
-
On your Square Terminal:
-
Press Sign In.
-
Select Use Device Code to Sign In.
Note: The device code expires in 5 minutes. Generate a new one if needed. -
Enter the generated device code.
-
Press Sign In again.
-
Confirm Pairing:
-
Once the device is paired, the terminal will display "Ready for payments" on the screen.
Note: Connection is only possible with the Square Terminal device, the Square Reader is not an option.
Assign a payment method to a price list in 2.0
Use these steps to confirm your payment method is assigned to the correct price list(s) after you are migrated from 1.0 to 2.0, or to re-assign a payment method to a different price list.
- Click the dot menu for a payment method.
- Click Edit payment method.
- Check the box next to the price list you want to assign or unassign.
- Click Save.
Add a custom payment fee
You can add a custom payment fee to online gateway and custom payment methods. This can help with offsetting credit card fee costs or other workflow costs like those associated with packing orders.
These fees displayed during checkout to your customer, and in your back office in the Log order, Subscription order, Invoice and order email views.
Fees on orders including Subscription orders are editable from your back office, except when they are paid by credit card.
The custom fee is not applied against any portion paid by store credit.
Order exports with a cost breakdown include these fees.
- In Fee title, give the fee a name.
- Use the Fee controls to specify whether the fee is:
- A $ amount
- A % percentage
- If you want to tax the added fee, in the Tax additional fee section, click the toggle to enable it.
- Specify the tax rate % you want to apply.
Edit a payment method in 2.0
You can edit custom, offline payment methods from the Payment methods tab.
- Click the dot menu for a payment method.
- Click Edit payment method.
- Make the needed changes.
- Click Save.
Delete a payment method in 2.0
You can delete custom, offline payment methods from the Payment methods tab.
- Click the dot menu for a payment method.
- Click Delete payment method.
- Make the needed changes.
- Click Save.
Override the default product tax rate in 2.0
By default, the sales tax rate that is applied to products marked as taxable is destination-based, or based on your customer's location (zip or postal code). If your customer has not specified a shipping address in their account, then sales tax is based on your business address as specified in your account settings.
If you are located in a state that applies origin-based sales tax or the tax rate is not calculated correctly, you can override the default rate. When you use the tax override that tax rate is applied to all of your products and customers.
Please note that overriding the tax rate will apply to all taxable products, at this time it is not possible to apply different tax rates for different products. You can override the tax rate that is applied to your fulfillment plan fees from the Fulfillment page.
- On the Sales Tax tab, click the toggle to enable the Override tax rate feature
- Enter the tax rate