Share your brand with customers and add a custom message to engage them.
Configure storefront settings in 2.0
Register as a customer on your 2.0 storefront
Share the shopping guide with your customers
The Storefront page is where you design and manage the global aspects of your storefront. A lot of settings are price list-specific, and so are found in the price list settings.
Design your storefront
Users migrated from 1.0
Some of your storefront settings from your 1.0 account are automatically migrated to your 2.0 account:
- Cover image
- Profile image
- Tell us about your business
Your certifications, business name and contact details are not migrated automatically. See Add your store info, Customize your about us page and Add custom tabs below for how to add those details manually.
New Local Line users
Add your store info
Your Store Info settings are displayed in the footer of your storefront.
- Go to the Storefront page, Store Info tab.
- Enter your Contact Information.
- [Required] Enter a Store name.
- Enter a Phone Number.
- Enter the Email address you want customers to contact you at.
- Enter your Business Address.
- Click Apply.
- Enter your Social Links, if applicable.
- Enter the URL for your Website.
- Enter the URL for your Twitter/X account.
- Enter the URL for your Facebook page.
- Enter the URL for your Instagram account.
- Click Apply.
Customize your about us page
Your About us page is a space to share your farm’s story and to include things like your certifications.
- On the Storefront page, click the About us page tab.
- If you do not want to display an About us tab on your storefront, click the toggle to disable it.
- [Optional Specify an About us tab title if you prefer to call it something other than 'About us'.
- [Optional] Add an About us header (the title that appears at the top of the page).
- Enter more details About your business. You can make text bold, italic or underlined, and add lists, hyperlinks and emojis.
- [Optional] Add a Header image. The maximum image size is 10 mb. Images are supported in these formats: .jpeg, .jpg, .png. Use the image size controls:
- Select Fixed width image to have the image scale relative to the page content.
- Select Full width image to have the image span and scale relative to available space on the page.
- Click Add image and select an image to upload.
- Or, drag + drop an image from your files.
- Click Apply.
Customize your shop page
Add messaging to communicate with your customers, and images to promote your brand.
- On the Storefront page, click the Customization tab
Add custom storefront colors
Customize your storefront colors with hex codes. We recommend using a single color with variations in shade that scale from lightest to darkest. You can use this tool to browse color palettes or create your own and get your codes.
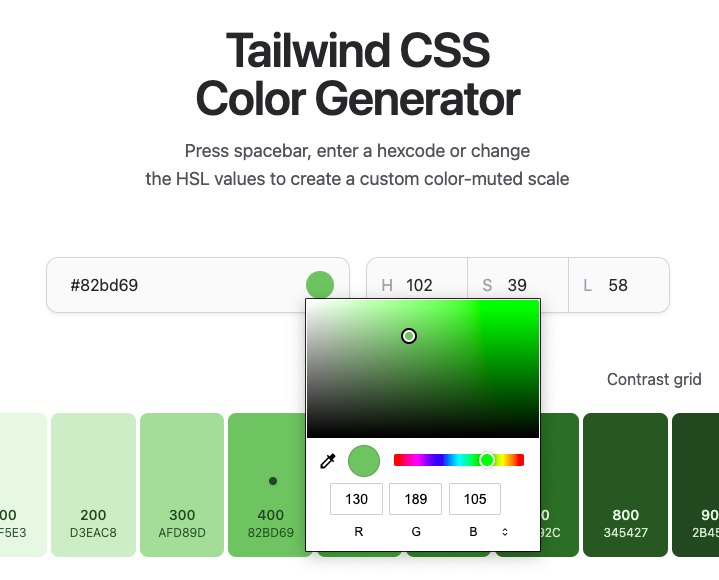
To create your own palette, click on the default color dot to select a starting color, and the tool will give you other shades of that color.
If you use this tool you might want to generate similar darkness levels to the default, which is optimized for design and accessibility best practices.
To do that we recommend using these shades:
- 100 for Hex 1
- 600 for Hex 2
- 700 for Hex 3
- 900 for Hex 4
- Go to the Storefront page.
- Go to the Customization tab.
- In the Customize colors section, add the hex code for the color you want to apply.
- Color Hex 1 is primarily used for backgrounds like you see in filter tags. We recommend that this is your lightest color.
- Color Hex 2 is the most commonly used in your storefront and appears on buttons and navigation links. It should be dark enough that white text is readable when placed on it.
- Color Hex 3 is primarily used for checkboxes, text links, and button hover states.
- Color Hex 4 is primarily used for selections and hover states such as checkboxes and text links. We recommend that this is your darkest color.
- Click Apply.
Add custom links
You can add custom links to the navigation bar. For example, you can add a link to your website, a payment platform like PayPal where you may accept e-transfers, or link to a private price list to make it more discoverable.

- On the Storefront page, click the Customization tab.
- In the Topnav Customization section, enter a Title and URL for up to 5 links.
- Click Apply.
Set product listing format
By default, price lists are set to Display Products in a Grid format, but you can switch to a List format.
Mobile view is independent of these settings as it has a unique design that is optimized for mobile.
- On the Price Lists page, click the Edit Settings button beside the price list you want to change.
- In the Storefront Images, Default Product Listing Format section, choose your preferred format:
- Display Products in a Grid
Grid View arranges products in a series of rows and columns, allowing customers to browse a large number of items at a glance. This view is perfect for storefronts with a large number of products. - Display Products in a List
List View displays products in a single column, providing detailed information for each. It's ideal for stores with fewer items or when in-depth product information is necessary at first glance.
- Display Products in a Grid
- Click Apply.
Configure general storefront settings
Display preferences
Choose what is displayed to your customers on your storefront Shop tab. By default, all preferences are enabled.
- On the Storefront page, click the Settings tab.
- Specify your Preferences.
- Click the toggle to optionally Show out of stock products.
- Click the toggle to optionally Show remaining inventory.
- Click the toggle to optionally Show product images.
Customer Account Settings
By default, all preferences are disabled
- Require Phone Number - require customers to enter a phone number when they are creating a new account in your storefront
- Require Address - require customers to enter their address when they are creating a new account in your storefront
- Require Business Name - require customers to enter a business name when they are creating a new account in your storefront
Checkout Settings
By default, all preferences are disabled.
- Click the toggle to enable Enable guest checkout if you want to let customers check out without creating an account.
- When your customer uses guest checkout, their email, first and last name are captured and displayed on your Customers page table in your back office. If they have placed an order for delivery and entered a delivery address, this will also be saved to the account.
- If they exist as a registered customer in your back office already, their guest order is associated with their existing customer record. Similarly, repeat guest customers will have their orders consolidated under the same customer record.
- Enabling guest checkout can give you more visibility into your abandoned carts data on your Reports page Storefront tab should you want to reach out to those shoppers. This is because some shopper details like email, name and phone number can be captured in the guest checkout flow.
- Click the toggle to enable Require phone number on checkout. This is separate from the Customer Account Settings option so you can capture a phone number for customers using guest checkout as well.
Important note if you are using store credit: Customers must be registered (i.e. create an account themselves in your storefront, or complete their account setup from an invite link) and log into their account in order to use any available store credit. If store credit is an integral part of your customer ordering process, it is recommended to disable guest checkout so that customers are required to log into their account in order to place an order.
Automated email notifications
Configure which Automated email notifications your customers receive. By default, all emails are enabled and it is recommended to leave them enabled except in specific use cases. Note that some important transactional emails cannot be disabled.
Click the toggle next to an email notification to disable it. For more information on which email notifications your customer receives, see Customer email notifications in 2.0.
Open or close your store
The setting is now configured per price list instead of globally. You can manage it from each price list’s settings.
View your storefront
To view your private storefront you must register as a customer on your storefront and assign that customer to the private price list. Then, log in as that customer. Depending on how your price lists are configured, you may need to navigate to the private price list from the customer user menu.
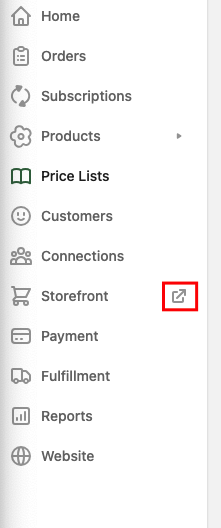
To view your public storefront, you can click the shortcut beside the Storefront navigation label:
This will open your current default price list. If your default price list is set as private, you will need to log in as a customer that has been added as a member of that price list in order to view it.
If you have more than one public price list, you can use the price list selector at the top to change to a different list:
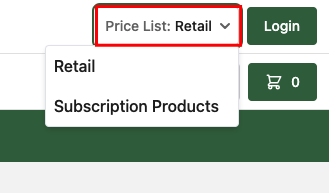
If you are logged in as a customer that is a member or one or more private price lists, they will also be displayed in this menu.
Register as a customer on your storefront
If you want to test your customer’s storefront experience, register as a customer on your own storefront.
- In your storefront, click the Login button.
- Click create an account.
- Enter your first and last name, and an Email address (you may want to use a different email address to avoid confusion when receiving email notifications)
- Enter a Password. Your password must contain at least 8 characters. Click Show to see your password as you type it.
- If you have enabled any of the additional options in your Storefront Customer Account Settings (i.e. phone number, address, business name), you will also need to fill these out when creating the account
- Check the box to Accept terms and conditions
- Click Create account
- Explore your storefront and/or use the Local Line 2.0 shopping guide to navigate it.
Share the shopping guide with your customers
Share the Local Line 2.0 shopping guide with your customers to support their storefront experience.
- Go to the Local Line 2.0 shopping guide.
- Copy the URL for the guide.
- Email your customers.
- Bulk email all of your customers.
- Go to the Customers page.
- Click the checkbox to select all. This only selects the first page of your customers...
- Click the Actions menu.
- Click Send email. This opens your default mail client (inbox) and populates your customers’ emails as bcc.
- Add a message to your email body that includes the URL you copied in step 2.
- Send your email.
- Email customers in a specific price list.
- Go to the Price lists page.
- Click on the price list whose members you want to send an email to.
- Click the Members tab.
- Click the checkbox to select all.
- Click the Actions menu.
- Click Send email. This opens your default mail client (inbox) and populates your customers’ emails as bcc.
- Add a message to your email body that includes the URL you copied in step 2.
- Send your email.
- Bulk email all of your customers.
Storefront reporting
You can view and download key metrics for your storefront from the Reports page. Learn more about Reports in 2.0.