
What Pick & Pack does
It’s Sunday night and your Monday pickup closes at 8 PM. One customer adds two dozen eggs at 7:55 and another cancels. With a printed list, you’d never know. Pick & Pack builds your pick and pack lists from live orders, so changes like these show up on your lists.
You choose which orders go on the lists, which columns show, and how everything is sorted. Your team then works through the lists in Local Line on a laptop, tablet or phone, or prints them. If an order needs a change while you’re packing, open it straight from its card and edit it in Local Line.
- Pick list: every product you need to pull across all orders, with totals, for gathering stock.
- Pack list: one card per order, listing exactly what goes in that customer’s bag or box.
This article walks through setting up your first template, starting a run, picking, packing, and printing. Pick & Pack is also the place to get a CSV or PDF of your orders: set up a template once, then use Export on any run.
 Before you start
- Where to find it: in the back office, go to Orders › Pick & Pack. It’s included on every LocalLine plan.
- What you need: orders with fulfillment dates. Pick & Pack pulls orders in by fulfillment date, so make sure your fulfillment plans (delivery plans and pick up locations) are set up first with the schedule pickup availability option. If you're using flexible fulfillment, your orders won't have a fulfillment date and won't be pulled in.
- Optional but useful: packing tags and categories on your products. These can power the extra columns, filters and grouping options to help you fine-tune your lists.
Key terms
Pick & Pack has two layers. A template is the setup you save once. A run is one batch of orders for a set of dates, made from that template.
| Term | What it means |
|---|---|
| Template | Saved settings: a name, which orders to include (filters), and how the pick and pack lists look. Name it after the fulfillment it serves, like “Sunday Market” or “Wednesday CSA”. |
| Run | The actual orders you plan to fulfill for the specified set of dates, pulled in using a template’s filters. Each run has its own pick list and pack list. |
| Pick list | One row per product (and package) across every order in the run, with the total quantity to pull. |
| Pack list | One card per order, listing that order’s items, notes and payment details. |
| Order window | Whether orders for the run can still come in. It shows as “Open until…” or “Orders closed…”, based on each fulfillment plan’s order cutoff. |
Create a template and your first run
You only set up a template once. After that, starting a new run only takes a few clicks.
Create the template
- Go to Orders › Pick & Pack and click Create Template.
- Under Template details, enter a Template Name.
- Under Fulfillment date, choose a Start date and End date if you want to create your first run now. This is optional. If you leave the dates blank, the template saves on its own and you choose dates when you create the first run.
- Under Additional filters, click Add filter to define which orders are included, for example by Pickup location, Delivery plan or Order status. Leave this empty to include every order in the date range. The count at the bottom shows how many orders match, and Preview in Orders opens those orders in a new tab.
- Under Pick List View and Pack List View, click Customize layout to change the columns and sort order. You can also just keep the default standard layout and change the template later. See Customize your lists below.
- Click Save and go back.
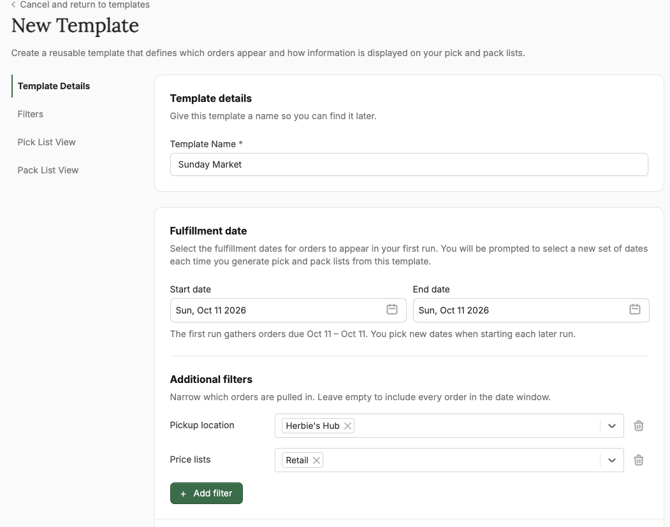
Filters you can add: fulfillment status, pickup location, delivery plan, hubs, order status, date placed, order tags, payment status, payment method, payment date, customer, customer tags, price lists, products, vendors, packing tag, keyword tags and attributes.
Customize your lists
Each Customize layout section shows a Live Preview with sample data, so you can see your changes before you save. You can also edit the layouts in the template later.
- Default sort and grouping (pick & pack): set how the lists display. Your team can change these from the live pick and pack lists as needed.
- Columns & Order (pick & pack): tick the columns you want and drag them into order. Your choice applies to the live lists and to exports.
- Pick list columns: Product, Pkg qty., Package, Package code, Item units, Base unit, Total units, Category, Packing tag, Package weight, Vendor.
- Pack list columns: Product, Package, Qty, Total, Packing tag, Item units, Base unit, Package weight, Total units, Vendor, Product ID, Package ID.
- Card header (pack only): choose which order details show at the top of each customer card. Options are Company, About this customer, Order #, Order status, Order tags, Fulfillment type, plan, date and time, Payment status, Payment method, Price list, Note from customer and Back office note.
- Show box contents (pick & pack): lists each box’s products as indented rows under the box.
Start a new run
Each time you’re ready for the next batch of orders, start a new run from your template.
Note: If you set fulfillment dates when you created the template, your first run is already waiting for you on the runs page. Use these steps for every run after that, or for your first run if you saved the template without dates.
- Go to Orders › Pick & Pack and click View runs next to your template.
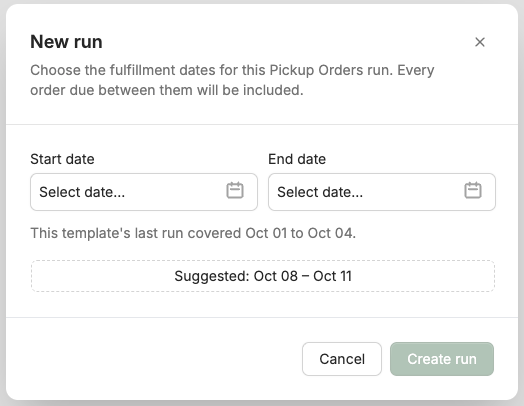
- Click New run.
- Choose a Start date and End date. LocalLine reminds you which dates the last run covered and offers a Suggested date range that you can click to fill in.
- Click Create run.
If the new dates overlap an earlier run, you’ll see a warning. You can still create the run, but orders due on the shared days will appear in both runs, and you risk picking or packing them twice.
Pick your products
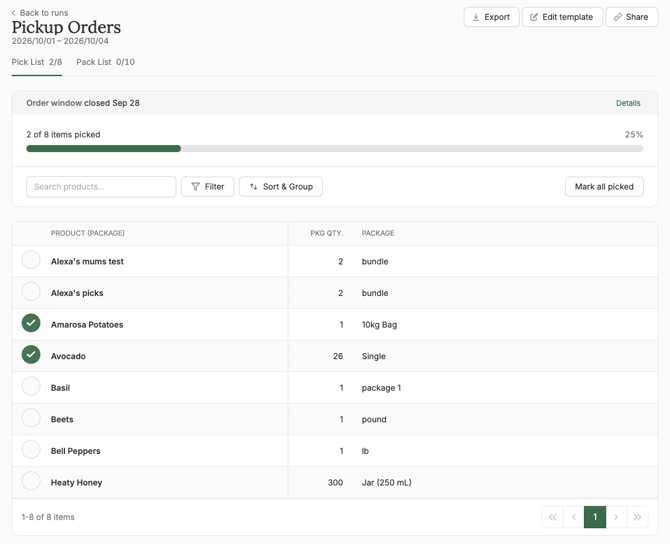
The pick list shows every product you need to pull for the run, totalled across all of its orders.
- Go to your template’s runs and click Pick next to the run.
- Pull each product, then click its row to check it off. The progress bar at the top counts items as you go.
- When everything is checked, a green Picking complete strip appears. Click Go to Pack List to start packing.

Working faster on the pick list:
- Search products to jump to a product by name.
- Filter by category, packing tag or vendor, for example to give one person just the cooler items.
- Sort & Group sorts products A–Z or by category, and groups them by category, vendor or packing tag.
- Mark all picked checks off every item shown in one step. If you’ve searched or filtered, only the matching items are checked. You’ll be asked to confirm first.
- Boxes appear with their contents listed underneath, when Show box contents is turned on in the template.
Pack your orders
The pack list gives each order its own card, so packers can see exactly what goes to each customer.
- Click the Pack List tab in the run, or Pack next to the run on the runs page.
- Check off each item on the card as it goes into the bag or box.
- Click Mark as Packed when the order is done. The progress bar counts packed orders. Marking an order packed here doesn’t change its fulfillment status in Orders.
- When every order is packed, a green Run packed strip appears with a Back to runs button.
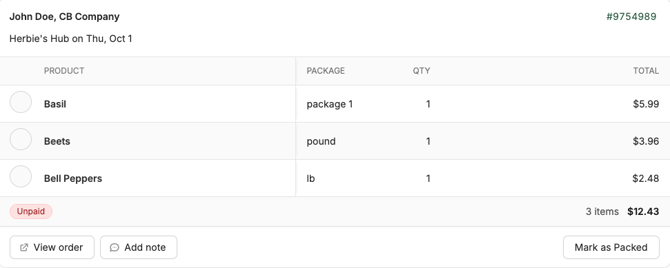
On each card you can:
- View order: open the full order to edit it.
- Add note: leave a back office note on the order. Customers don’t see it on their order history or invoice.
- Approve: approve an order that’s waiting for approval, without leaving the list.
- Click the customer’s name to see their contact details and edit About this customer, a place for allergies, gate codes or delivery notes.
Working faster on the pack list:
- Search customers to find an order by name.
- Filter to Unpacked orders only, or by category, packing tag or vendor.
- Sort & Group sorts orders A–Z, Z–A, by fulfillment time or unpacked first, and groups them by fulfillment method, fulfillment plan or order status.
- Switch between List (every card on one page) and Focus (one card at a time, with Previous and Next). Focus works well on a phone or tablet at the packing table.
When orders change
Pick & Pack lists stay connected to your orders. A coloured strip at the top of a card tells you when an order needs a second look:
| Strip | What it means |
|---|---|
| Awaiting approval. Order details may change. | The order hasn’t been approved yet. Pack it with care, or approve it from the card. |
| This order has changed. Review before shipping. | The order was edited after you packed it. Check the card against what’s in the box. |
| This order was cancelled. | Don’t ship it. Cancelled orders don’t count toward your packed total. |
If orders change while you have a list open, you’ll see This run has changed. Click Refresh to load the latest version.
The Order window on the runs page shows whether customers can still order for that run. Once a run’s last day has passed, its lists stop updating. Any order changed after that is listed under Changed after closing in the order window details, so you can check it by hand.
Print, export and share
Print your lists if you’re working in a field or barn without a screen, or want a paper backup. Your exports use the same columns and order you set up in the template.
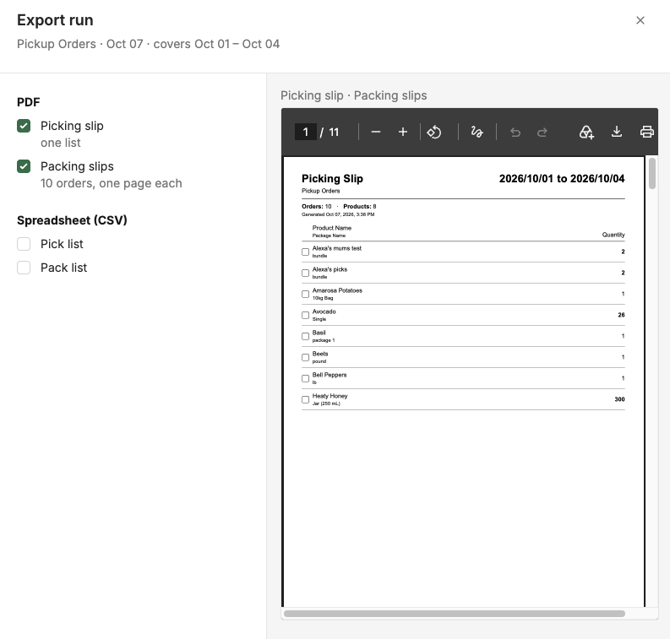
- On the runs page, click Export next to the run. You can also click Export at the top of an open run.
- Choose what you need:
- PDF: Picking slip (one list) and Packing slips (one page per order).
- Spreadsheet (CSV): Pick list and Pack list.
- Check the preview on the right, then click Print or Download.
Share a list: click Share at the top of an open run to copy a link to that list. Send it to a teammate. They’ll need to sign in to the back office to view it.
Best practices
- One template per fulfillment day or channel. A “Saturday Market” template and a “Wednesday CSA” template keep each team’s lists short and relevant.
- Start the run after orders close. The order window on the runs page tells you when every plan in the run has closed.
- Split the work with filters. Filter the pick list by packing tag or vendor so the person in the cooler only sees cooler items.
- Print as a backup, check off in the app. Paper is handy in the field, but only the live lists show late edits and cancellations.
Frequently asked questions
Can I change a template after I’ve used it? Yes. Click Edit template from the runs page or an open run. You can also Duplicate a template from the Pick & Pack page to start a similar one.
What happens to my runs if I delete a template? The template is removed and pick and pack lists you generated are deleted.
Can I delete a run? Yes. On the runs page, open the dot menu next to the run and choose Delete. This can’t be undone.
Why is an order on two runs? The two runs’ dates overlap. Orders due on the shared days appear in both.
Does checking items off change my inventory? No. Checking items off the pick list or pack list only tracks your progress. It doesn’t adjust inventory. Inventory for tracked products has already been deducted when the order was placed.
What’s next
- Fulfillment: set up the delivery plans and pick up locations that your runs are built from.
- Orders: edit, approve or cancel an order. Changes show up on your pick and pack lists.
Need help? Contact support@localline.ca or use the in-app chat.