Orders
Log orders on behalf of your customers, manage orders placed through your storefront or a connected hub, or generated from Subscription plans
The Orders Table

The orders table is where you will view, create and edit orders in your Local Line back office. Orders that have been placed by your customers through your storefront, orders for products that you have shared though a connected hub, automatically generated orders from subscription plans, and orders you have created on behalf of your customers all appear in this table.
At the top of the table are controls for searching and filtering the orders that are displayed. In the search box, you can search by order number, customer name, company name, or email address. You can only apply one keyword search at a time, but you can combine it with the additional filters that are available.
The most commonly used filters are displayed from left to right, and there are additional filters available by clicking the More button:

Multiple filters can be applied, and in general will use a logical "or" match -- meaning filtering for Customer A as well as Customer B will show orders for both customers.
Any applied filters will be displayed at the top; clicking 'X' on a specific filter will remove it, and clicking Clear All will remove all filters:

Underneath the filter options are the bulk actions. These buttons will only work if one or more orders have been selected using the checkboxes on the left side of the table. Clicking the checkbox in the Order column header will select all orders on that page. By default, 50 orders will be displayed per page, you can change this value using the dropdown at the bottom of the table:

Also shown here is the page selector -- you can click on a number to go to that page of orders directly, use the single angle brackets (< >) to move to the next or previous page, or jump to the first or last page using the double angle brackets (<< >>). You can also move to the next or previous page with the page selector buttons at the top of the table.
An important thing to note is that any filters will persist as you move through pages in the table, or navigate to different areas of the back office. If you find yourself looking at a table with a lot fewer orders than you expected, double check to make sure there isn't a filter applied!
Selecting orders using the checkboxes enables the bulk actions at the top of the table. Selections will persist while moving through pages in the table, but not if you navigate to a different section in your back office. In addition, selections will persist after completing a bulk action, so you can efficient perform multiple actions on a single group of orders without having to re-select them. At the top of the table it will show how many orders have been selected:

You can click Deselect to remove any current selections. It's important to double-check that you don't have more orders selected than you intended when performing a bulk action, you wouldn't want to accidentally cancel an order!
The Orders page is where you can log an order on behalf of a customer, and manage your orders.
The Orders table displays a detailed overview of your orders and their statuses, including order, payment and fulfillment status.
Use the search and filters to easily navigate your orders. You can search by order number, customer name or customer email. Click More… to see additional filter options. By default, orders are sorted by most recent order. Click the column headers to sort by that column. Note: Flexible fulfillment dates are indicated with a hyphen (-), and if there is a pick up timeslot it is displayed with the fulfillment date.
Changing the Orders Table Layout
If you wish to change which columns are displayed, or the order in which they appear, you can click the table layout edit button at the top-right of the table:

In the layout edit mode, each column will have a visibility toggle (the eye icon), and a handle that can be dragged to change the ordering of the columns:

After you have finished making changes, click the Save button to save, or Cancel to revert the changes. The changes are only saved for your user account on that particular device and browser.
Order statuses in 2.0
The Orders table organizes your orders into different tabs based on their status.
- Open - Orders that are still active as far as payment and fulfillment and that have not been manually closed.
- Closed - Orders that have been paid, fulfilled and manually closed.
- Cancelled - Orders that have been cancelled.
If you have the "Needs approval" workflow enabled for any products, an order that contains one of those products is flagged in the table with an  orange exclamation point icon. This means that your customer's card has not been charged yet. After you approve the order you can charge the card your customer specified at checkout.
This is how these events are displayed in your payment gateway account:
Gateway
Stripe
Square
When order is placed.
A payment shows in Stripe as ‘Uncaptured’ and your customer sees a pending charge on their credit card statement.
No transaction shows in Square until it is fully captured. The customer sees a ‘pending charge’ in their credit card statement.
When order is accepted.
The payment in Stripe immediately changes to ‘partial refund’ indicating that the unused buffer amount of 15% is refunded to the card. The customer’s credit card statement does not see this immediately.
The transaction now shows in Square as the amount that was actually charged. The customer still sees a pending transaction on their credit card statement until it processes.
The order stays in a Needs approval status until you have manually updated the order with the final weight, at which point you can approve the order and then request payment details or charge the card on file.
Payment status
Payment statuses are indicated in the Orders table and are color-coded to give you an at-a-glance overview.
- Unpaid (red) - No payment has been received for the order.
- Overdue (red) - No payment has been received for the order and the order has exceeded the payment terms you defined in your price list.
- Pending charge (brown) - The order contains a product for approval and the payment method is either credit card or ACH with LocalPay.
- Paid (green) - Payment has been received for the order.
- Refunded (blue) - You have processed a refund for the order.
- No status (grey) - No payment method has been specified. This status is only applicable to orders you log on behalf of your customers.
Fulfillment status
Fulfillment statuses are indicated in the Orders table and are color-coded to give you an at-a-glance overview.
- Unfulfilled (red) - The order has a fulfillment plan specified, and either has no date associated with it or it has not been manually closed. If the status also displays an exclamation mark, the order is past its specified fulfillment date.
- Scheduled (brown) - The order has a fulfillment plan and date specified.
- Packed - This status is optional and is set by clicking Mark as packed in the Fulfillment panel in the Edit order view.
- Ready for pick up (blue) - The order has a pick up location specified that has the Notify when ready availability setting applied. The status changes from Unfulfilled to Ready for pick up when you click Ready for pick up in the Fulfillment panel in the Edit order view.
- Fulfilled (green) - Your customer has received their order and you have clicked Mark as fulfilled in the Fulfillment panel in the Edit order view.
- No status (grey) - No fulfillment plan has been specified. This status is only applicable to orders you log on behalf of your customers.
Log an order in 2.0
When you log an order on behalf of your customer, they receive an order confirmation by email just like they do if they place an order on your storefront.
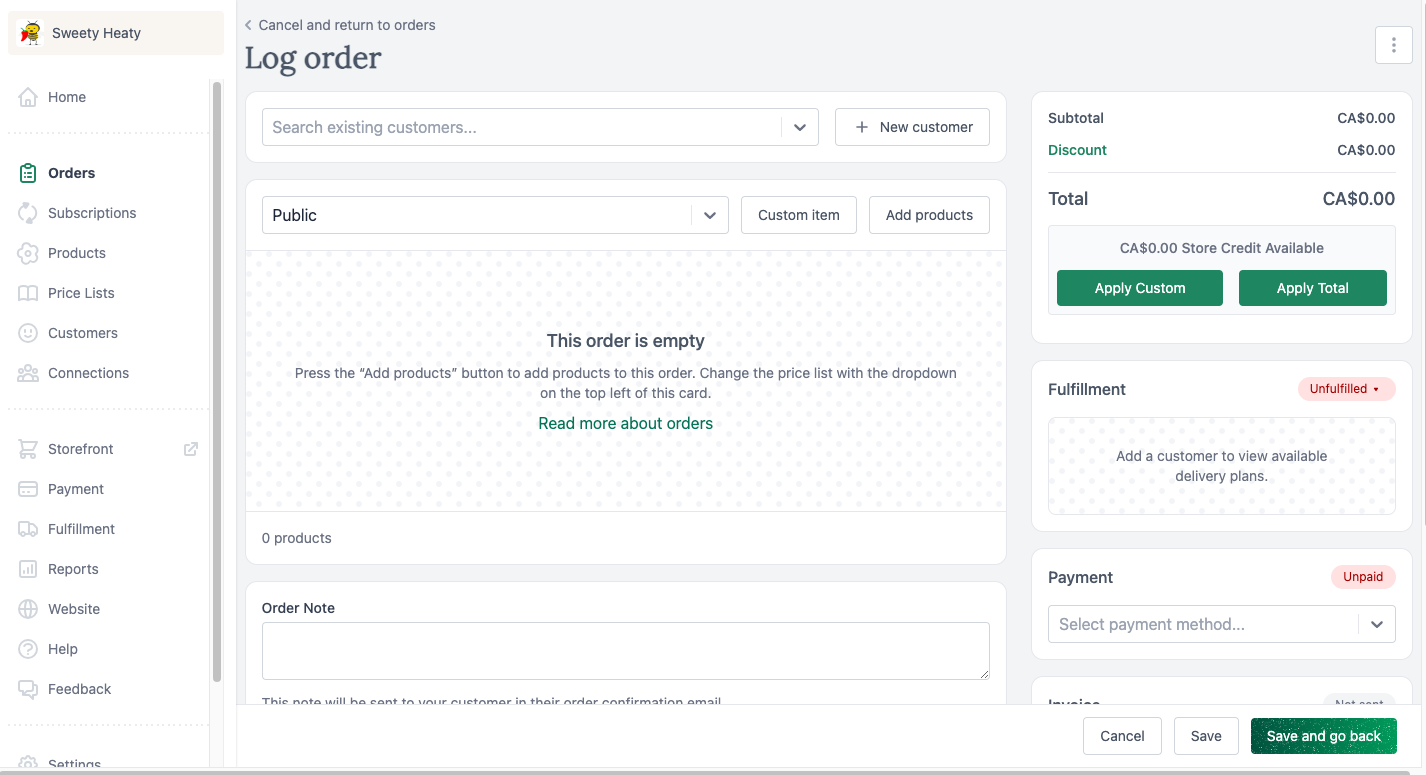
- On the Orders page, click + Log order.
- [Required] Use the search box to select or search for your customer. If the customer you want to log an order for is not yet registered or you have not yet added them through your back office, click + New customer to add them and complete the Add customer flow.
- [Required] In the dropdown menu below your customer’s information, select the price list the customer is a member of that contains the products you want to add to the order.
- [Required] Click + Add products. You can add products that are out of stock and not marked visible, as well as exceed the available remaining inventory quantity for a product.
- Use the search box to search for a product.
- Use the category dropdown menu to filter products by category. This option is only displayed if you have created categories in your price list.
- Use the + and - controls to adjust the quantity of a product.
- Click Save when all products have been selected.
- If you want to add a one-time item, fee or service, click Custom item and specify the Name, Price per item, Quantity, and check the box if the item is taxable and enter a tax rate. Then, click Add to order. Custom items are not added to your Products page, but are included in some Reports page metrics, like Top selling products and Net sales.
- If you want to override the price list price, click the unit price (in green) and use the controls to apply the price adjustment.
- Use Set to enter a new price manually.
- Use $ to specify a dollar amount to increase the existing price by.
- Use % to specify a dollar amount to decrease the existing price by.
- Click Save.
- You can add tags and notes in the Back office details section.
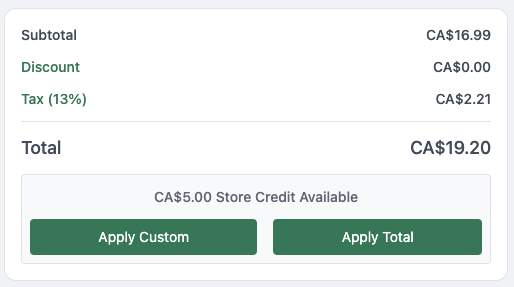
- If you want to adjust the discount, click the green text in the order summary panel, specify the amount and then click Save. To apply store credit, click Apply custom to specify a custom amount or Apply total to apply the entire balance.
- [Required] Select a fulfillment plan in the Fulfillment panel.
- Select fulfillment type (delivery or pick up) from the dropdown menu.
- Select the specific delivery plan or pick up location from the dropdown menu.
- Select the fulfillment date.
- Update the fulfillment status in the Fulfillment panel.
- Click Mark as packed if you have already packed the order.
- Click Ready for pick up if the order is ready. This option only displays if you have selected a pickup location that has the Notify when ready availability setting applied.
- Click Mark as fulfilled if the order is in-person or has already been fulfilled.
- Select the payment method in the Payment panel.
- Select the payment method from the dropdown menu.
- If your customer has previously paid for an order by credit card and opted to save their credit card details, you can skip to step 11 (Charge card).
- If your customer has not previously paid for an order by credit card but has provided you with their card details, select a credit card method and then click Add card to enter the card details.
- If you’d like to request their credit card details so you can charge their card on their behalf, click Request payment.
- Enter the Name on card.
- Enter the Card number.
- Enter the card Expiry.
- Enter the card Security code.
- Enter the customer’s Zip/Postal code.
- Check the box to Save card on customer file. This saves the card to your customer’s account so you can charge it again later.
- Click Add.
- Click Charge card.
- Click Confirm. A toast message is displayed if the payment is successfully processed. If there is a problem with processing payment, a modal is displayed to inform you.
- Select the Payment due date.
- Select the payment method from the dropdown menu.
- Update the payment status in the Payment panel.
- If the order is already paid, click Mark as paid.
- Click Save.
Edit an order in 2.0
Only Open orders can be edited.
Only these fields can be edited on an order that is paid using any payment method:
- order note
- back office details
- fulfillment date, status, and plan
If an order is paid by credit card, the fulfillment date, status and plan can be edited. But, if you change the fulfillment plan (e.g. from one delivery/pick up plan to another, or from delivery to pick up or vice versa) any fulfillment fees you have defined is not updated automatically.
To edit other fields on orders paid by credit card, you can duplicate the order. The new order can be edited and you can cancel the original one.
- On the Orders page Open tab, click the dot menu for an order.
- Click Edit order.
- Note: If you want to edit order line items for an order that is marked paid using a payment method other than credit card, you must first mark it unpaid from the right-side options. If you do not want your customer to receive another email notification when you mark the order paid again, Storefront settings .
- Make the needed changes.
- If the order has an Authorized , the payment method cannot be edited. In this case, duplicate the order and set a new payment method.
- If you want to add a one-time item, fee or service, click Custom item and specify the Name, Price per item, Quantity, and check the box if the item is taxable and specify the sales tax rate. Then, click Add to order. Custom items are not added to your Products page, but are included in some Reports page metrics, like Top selling products and Net sales.
- Click Save if you want to remain on the page, or Save and go back if you are done making changes.
Your customer is not automatically sent an email with the changes. If you want to send them a new copy of their order, click the dot menu and then Edit order. From the edit view, click the Send invoice button.
Merge order line items
Note: The merge feature is not available for subscription orders.
When products tracked or charged by weight are added to an order they appear as separate line items. This is so each package can be updated with its unique weight.
You can merge multiple line items of the same product into one. With one click you can sum the total weight of all identical items and manage them as a single line item. This means you can weigh and update several units of the same product from a single line item.
Orders placed from storefront still split into single line items, and any new products added to the order still split into single line items, until merged.
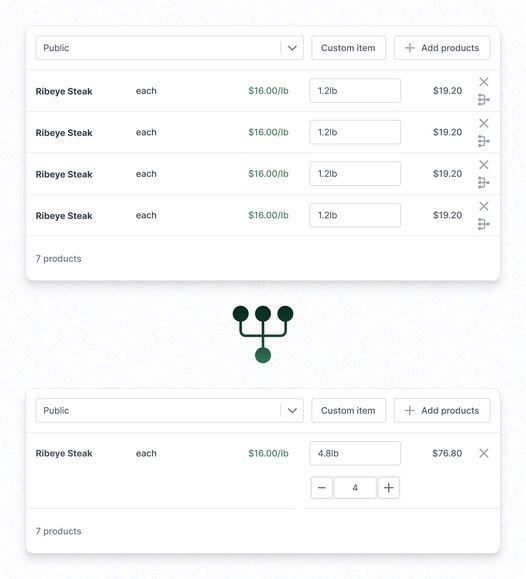
When you merge line items:
- Unit quantities or weights are summed.
- Item/Weight and Weight/Item line items have a unit quantity selector.
- Increasing unit quantity increases weight by average pack weight.
Note: When line items are merged the product price is reset to its default, so any changes to price you made on line items before merging is lost.
To merge line items, just click the merge icon next to a weighted product line item.
Discount an order in 2.0
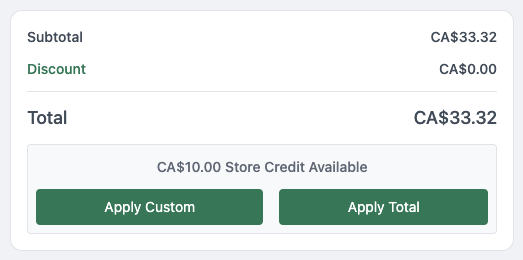
You can reduce the cost of a product on an order by applying a discount or coupon code.
- On the Orders page Open tab, click the dot menu for an order.
- Click Edit order.
- Click on Discount indicated in green text.
- Enter the discount amount.
- Click Save.
- [Optional] Add a note that references the coupon code or promotion the discount relates to.
- Click Save.
Duplicate an order in 2.0
Use the duplicate feature to save time when you have multiple, identical orders to log.
- On the Orders page (any tab), click the dot menu for an order.
- Click Duplicate order.
- Make any needed changes.
- Click Save.
Approve an order in 2.0
Orders with a Needs approval status are indicated in your Orders table with an  orange exclamation point icon.
Inventory is already deducted for needs approval products when the order is placed, but inventory adjustments may occur when the order is approved.
Note: If you have set payment terms for the payment method on the order that needs approval, they begin only after you approve the order.
- On the Orders page, click the dot menu for an order.
- Click Edit order.
- Click Edit line items. After making changes click Save line items. If you do not click that button the changes are not applied.
- Click Approve.
- Click Charge card to process payment for the final order total, or change the payment method if applicable and send the invoice to your customer to complete payment.
- Click Save.
Cancel an order
If you need to cancel an order, follow these steps. Once an order has been cancelled, it cannot be reopened. Cancelled orders can be duplicated if you need to recreate the order.
- On the Orders page Open tab, click the dot menu for an order
- Click Cancel order
- Select inventory and refund preferences
- Check the box to Restock inventory if you want to return the cancelled products to your inventory
- Check the box to specify if No refund or a refund applies
- Click Cancel order
Mark an order paid/unpaid (for custom payment methods)
- On the Orders list, click the Edit button beside the order
- In the Payment Method section, click Mark as paid or Mark as unpaid
- Click Save
When marking an order as paid, an email is sent to your customer to notify them, unless you have disabled this notification in your Storefront settings.
Refund an order
Refunding an order in Local Line can be done when cancelling the order. If you need to refund a payment but you want to keep the order, consider offering the customer store credit instead. Alternatively, you can refund from your payment gateway instead of through Local Line (i.e. Square, Stripe or LocalPay). However, refunds made through the gateway's dashboard will not be reflected in Local Line, so it's recommended to make a note on the order so you can keep track.
Download order labels
To download an order label, select the orders you'd like to download then click "Download Labels".
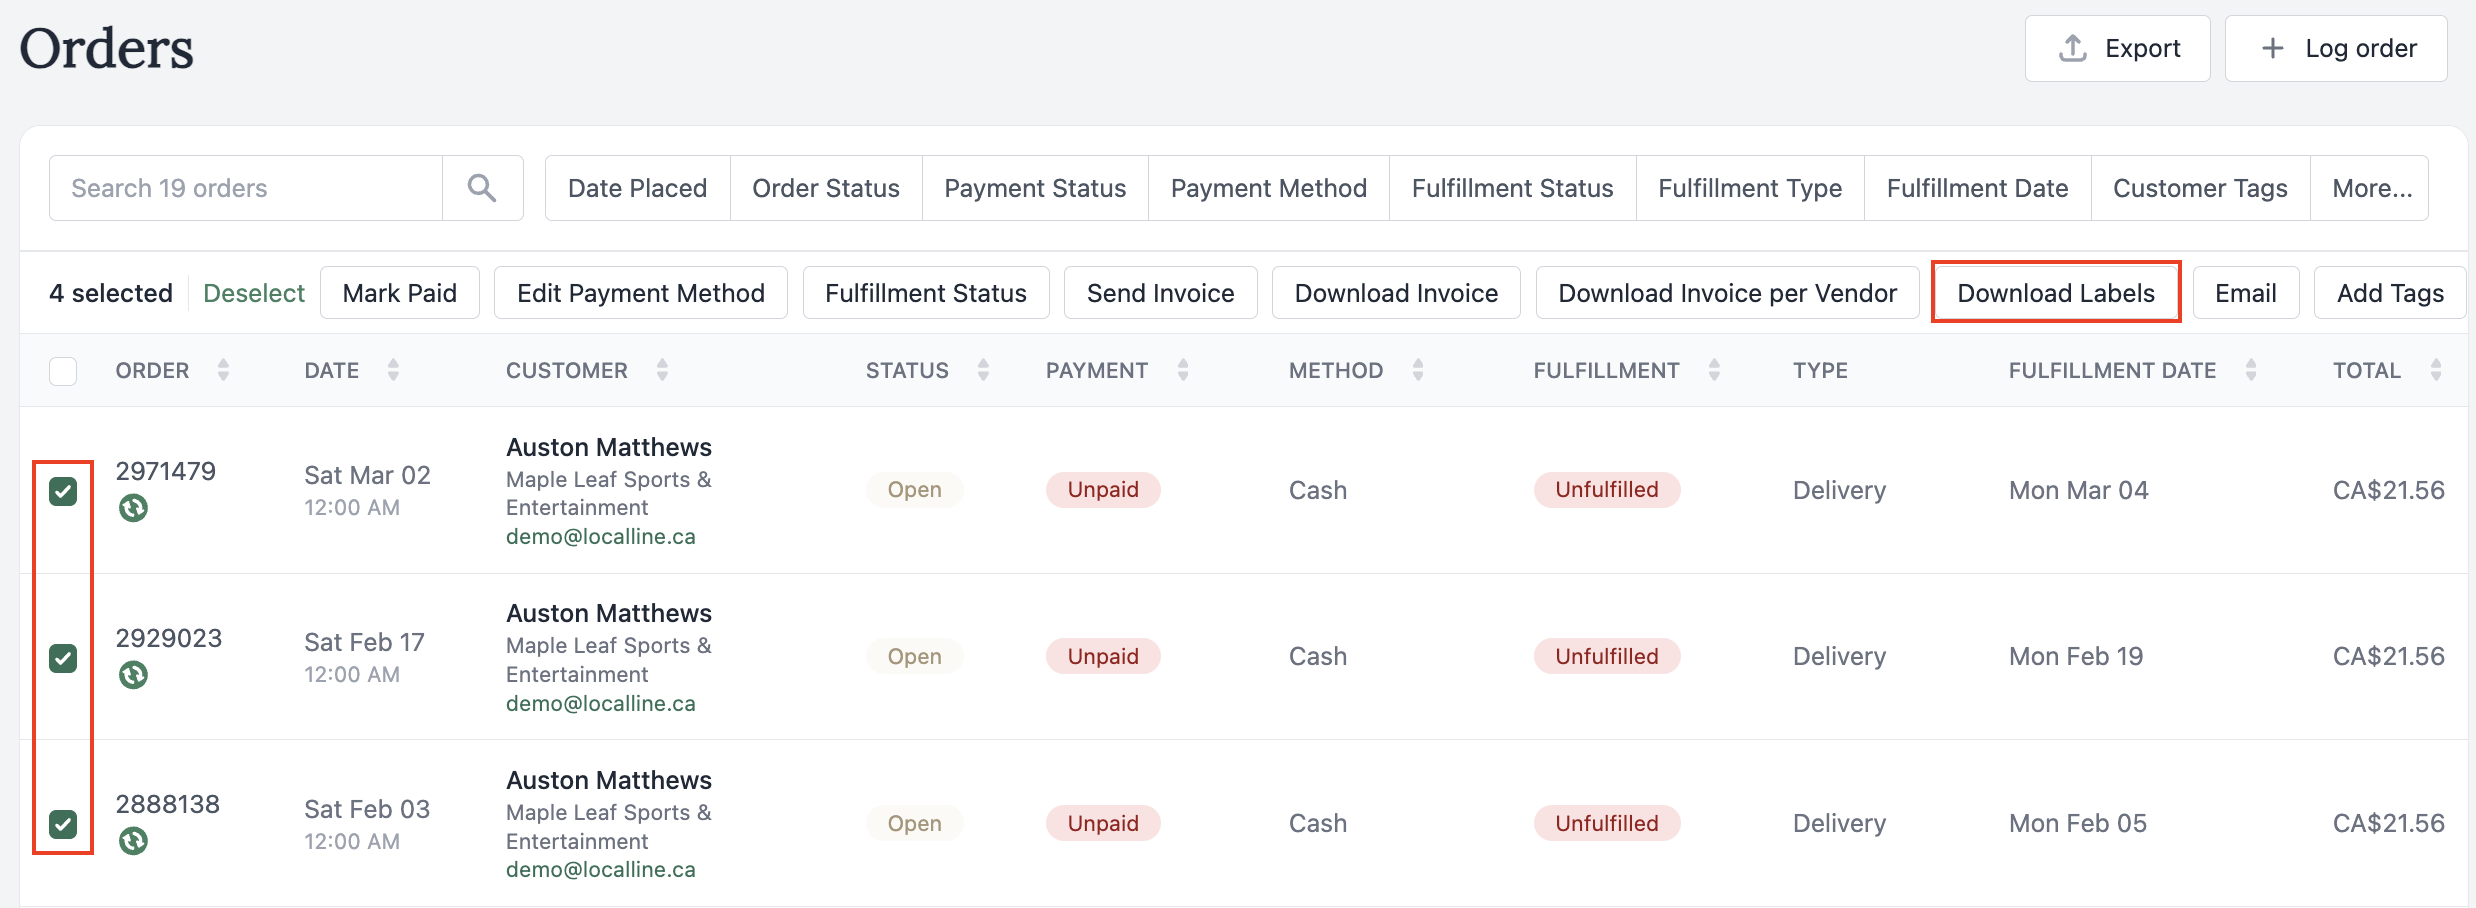
Once you click 'Download Labels', you'll be able to select from several different label sizes for either inkjet or thermal printers.
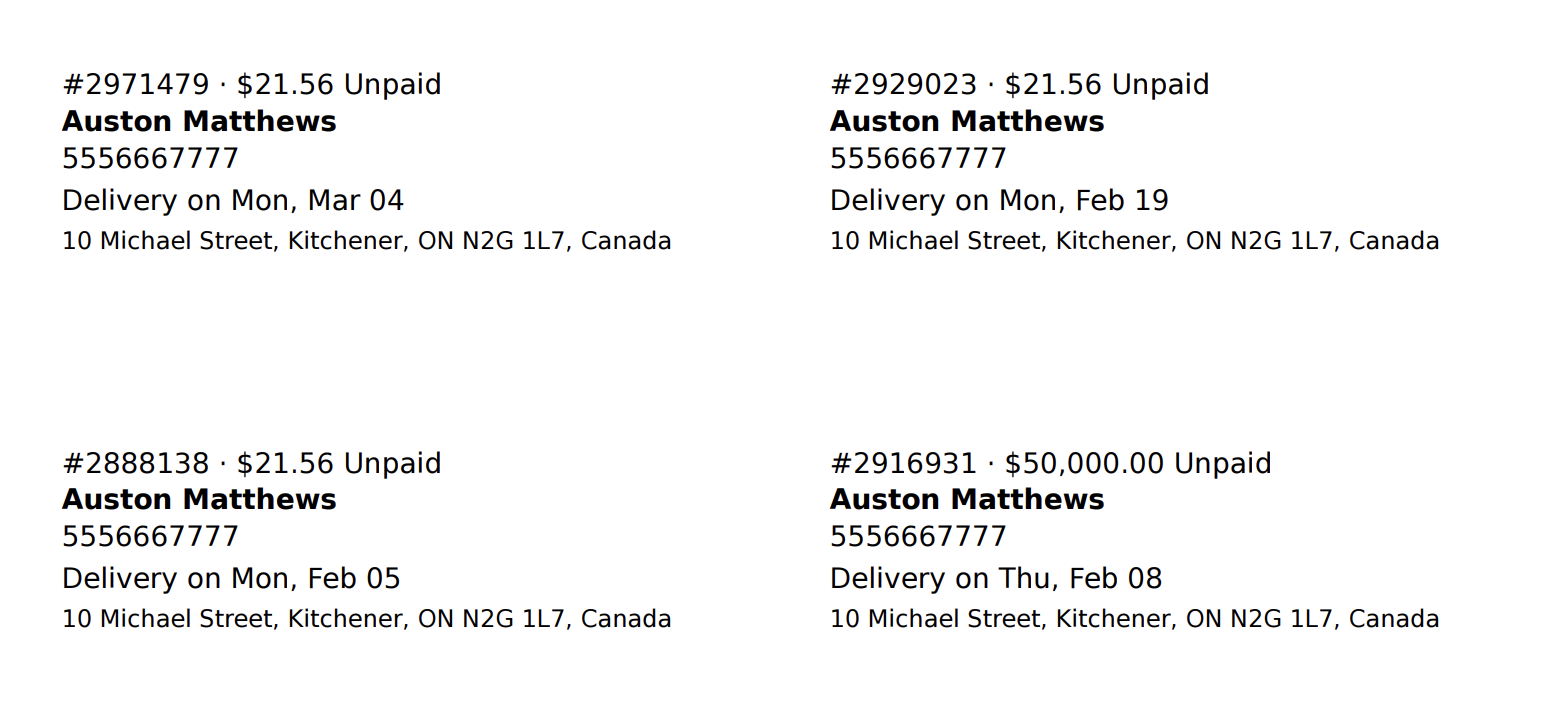
Here is a sample of that the 2 x 4" label looks like:
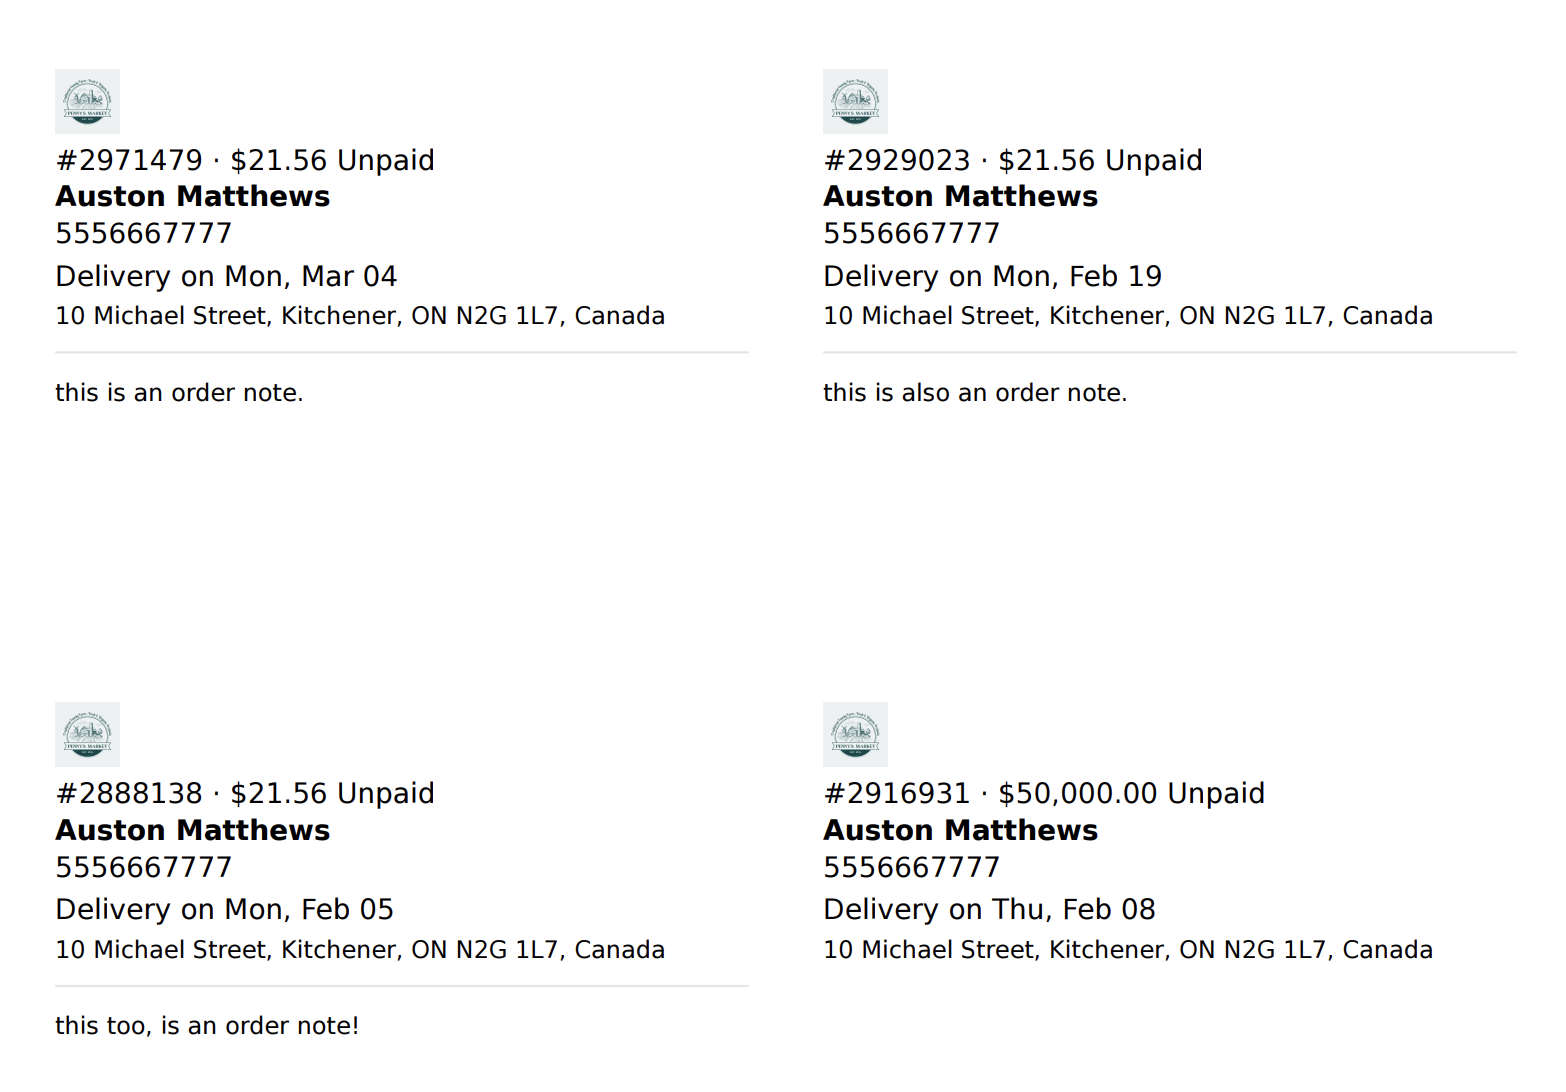
Here is a sample of what the 3 1/3 x 4" label looks like:
Download an invoice in 2.0
By default, invoices are downloaded by the date the order was opened(descending), and then by the order number (descending).
- On the Orders page (any tab), click the dot menu for an order.
- Click Download invoice. The invoice is downloaded as a PDF file.
If you want to download invoices in bulk, see Make bulk changes to orders in 2.0.
Send an invoice in 2.0
- On the Orders page Open tab, click the dot menu for an order.
- Click Edit order.
- In the Invoice panel, click Send invoice.
- Click Send.
All changes are auto-saved when you click Send invoice, in case you made changes without first saving manually. This helps to avoid incorrect invoices being sent.
An invoice's sent status is indicated in the order edit view after the page is navigated away from or reloaded, including a date and time stamp. If you make an update to the order, the status changes to Send updated.
Close an order in 2.0
Closed orders cannot be edited. You can only duplicate it or download its invoice. Your customers can only use the Order again - which lets them reorder a past order with a single click - if you have closed their order.
- On the Orders page Open tab, click the dot menu for an order.
- Click Close order.
- Click Confirm. The order is moved to your Closed tab.
Orders bulk actions in 2.0
- Check the box to select all orders or manually select the orders you want to change.
- Click the action you want to take:
- Mark paid - Select the new payment status from the dropdown menu and click Save.
- Edit payment method - Select the new payment method status from the dropdown menu and click Save.
- Fulfillment status - Select the new fulfillment status from the dropdown menu and click Save.
- Send invoice - Click Send.
- Download invoice - Click Download.
- Download invoice per Vendor - Download an invoice for each vendor into a single downloaded file. Vendor invoices filter out any products that are managed by the hub.
- Email - This opens your default mail client (inbox) with your customers’ email addresses pre-populated as bcc.
- Add tags - Select an existing tag from the Order tags dropdown menu or start typing a new tag name in the box then click Create “tag name” to save the tag.
- Close - Click Confirm.
- Cancel - Select inventory and refund preferences.
- Check the box to Restock inventory if you want to return the cancelled products to your inventory.
- Check the box to specify if No refund or a refund applies.
- Click Cancel order.
Export orders in 2.0
All of the order exports from 1.0 are available in 2.0 and are downloaded to a csv format. See below for a cross-reference guide of the templates between versions.
If you migrated from 1.0 to 2.0, your 2.0 exports also include your 1.0 order data.
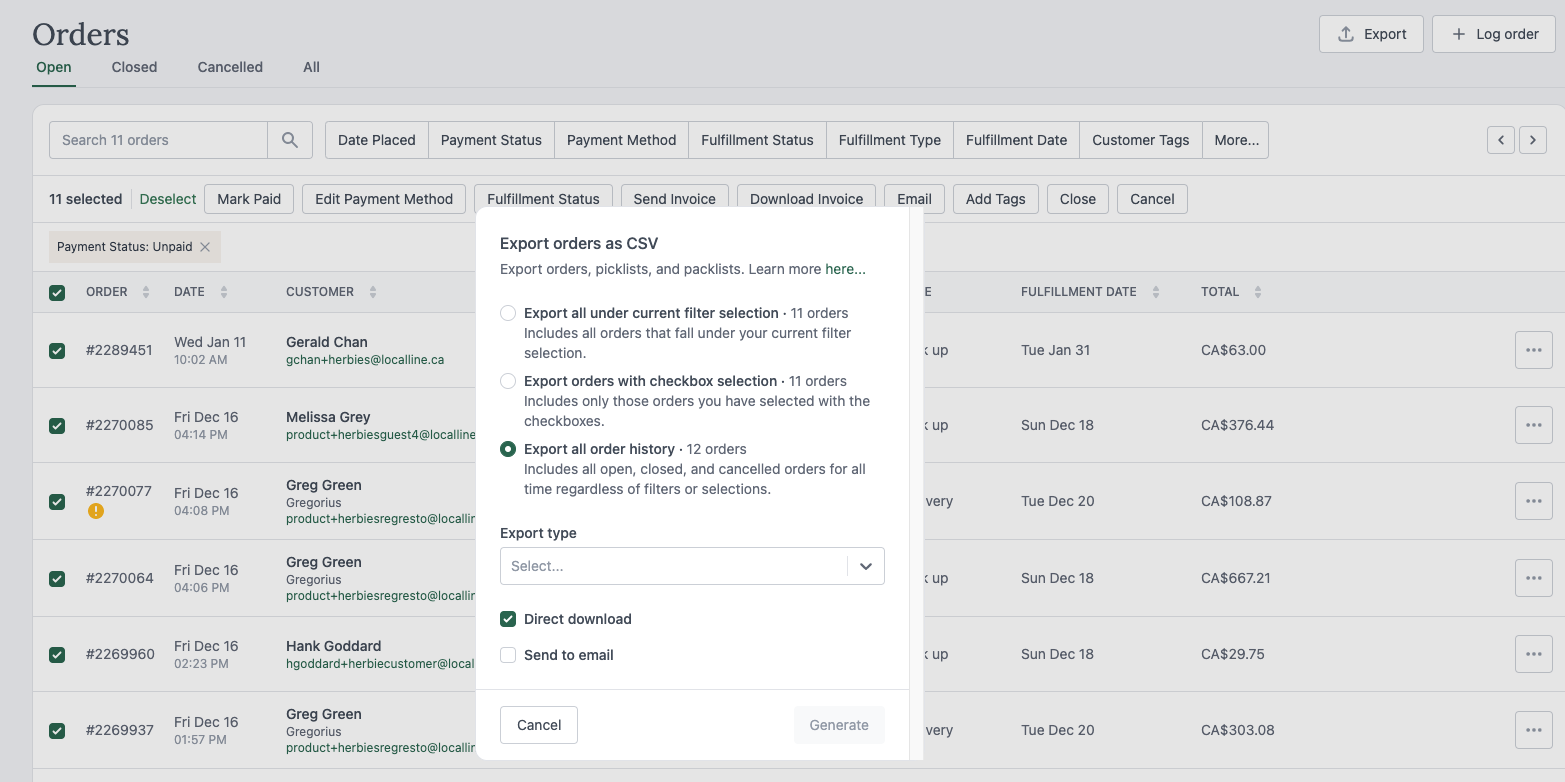
- On the Orders page, check the box to select all or specific orders you want to export.
- Click Export.
- Select which files you want included in the export:
- Export all under current filter selection - Includes all orders that fall under your current filter selection.
- Export orders with checkbox selection - Includes only those orders you have selected with the checkboxes.
- Export all order history - Includes all open, closed, and cancelled orders for all time regardless of filters or selections.
- Select the Export type (see table).
- Choose if you want the file to be downloaded directly or emailed to your inbox.
- If you are exporting a large number of orders:
- Apply filters to narrow the results.
- Check the box to Send to email.
- If you are exporting > 492 records, export smaller batches of records at a time.
- If you are exporting a large number of orders:
- Click Generate.
Download examples of each export below.
Tables can't be imported directly. Please insert an image of your table which can be found here.
1.0 export name
2.0 export name
Orders
Packlist (by customer, by product line item)
Orders - List view
Orders list (by product line item)
Summary pick list
Picklist (ideal for advanced inventory)
Detailed pick list
Picklist (ideal for basic inventory)
Orders summary
Order summary (no product detail)
Orders summary with product details
Packlist (by order)
The vendor payout export that Food hub's have in their account calculates the product base price (before any price adjustments are applied) as the amount to pay managed vendors.
Orders reporting in 2.0
You can view and download key metrics for your orders from the Reports page. Learn more about Reports in 2.0.
Export examples
See an orders export comparison from 1.0 to 2.0.
- Packlist_by customer_by product line item_csv.csv
3 KB Download
- Picklist_ideal for basic inventory_csv.csv
2 KB Download
- PIcklist_ideal for advanced inventory & aggregators_csv.csv
1 KB Download
- Orders list_by product line item.csv
4 KB Download
- Orders summary_no product detail.csv
2 KB Download
- Packlist_by order.csv
2 KB Download
