
The Customers page is where you add and manage everyone who buys from you. Customers are also added automatically when they register on your storefront or check out as a guest.
This article covers adding customers yourself, editing their details, and disabling, deleting, or exporting them.
The Customers table
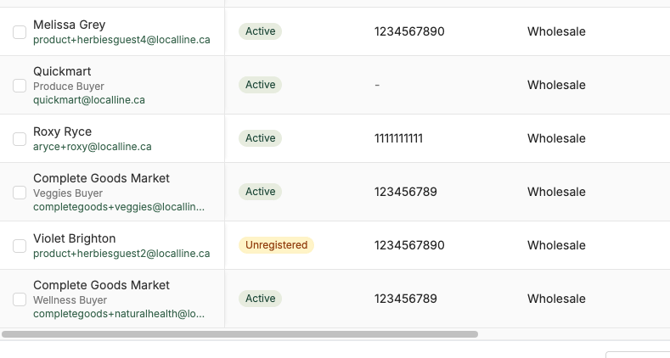
The Customers table lists all your customers with their status:
- Active: registered on your storefront and can log in
- Unregistered: added by you, imported, or checked out as a guest, and can’t log in yet
Use the search bar to find customers by first name, last name, or company name. Use the filters to narrow the list, for example by tag. See Customer accounts & login for more on customer status.
Adding a customer
- Go to the Customers page
- Click Add customer
- In Customer info, enter their details:
- First and last name (optional)
- Company (optional)
- Phone (optional)
- Address (optional)
- Billing Address (optional)
- In Price List Access, check each price list the customer should be a member of. See Assigning customers to price lists.
- In Back Office Details, add Customer Tags and Notes if you’d like. Only you and your team can see these. See Customer groups & tags.
- In Preferences, optionally check the Send account invite option to send an email invitation so your customer can create a password and log into your storefront.
- Click Save
Customers who don’t register can still shop as guests if you have the Guest Checkout option enabled. If you do not have the option enabled, customers will not be able to place an order unless they have registered and logged in. Private price lists always require registration and login to access, regardless of the Guest Checkout option setting. Store credit can also only be used by registered and logged in customers.
Importing customers in bulk
- Go to the Customers page
- Click the dot menu in the top-right corner
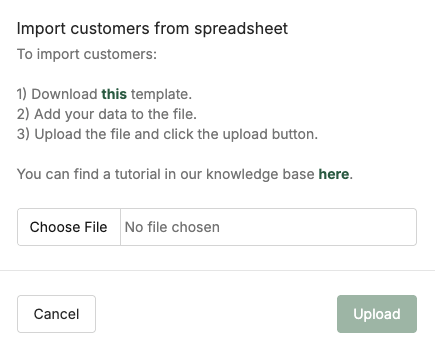
- Click Import customers
- Download the import template
- Fill in your customers’ details:
- To send a customer an invitation to register during the import, enter “True” in the Send account invite column. If you choose not to send it during the import, you can still send an invite later from the Customers table.
- Save the file as CSV or Excel
- Return to Import customers, click Choose file, then click Upload
If there’s a problem with the file, an on-screen message explains what’s wrong. Fix it in your file and upload it again.
Keep in mind:
- Tags and notes aren’t imported. Add them by editing customers after the import.
- On a Mac, iPhone or iPad, the template may open in Numbers. Export it as CSV or Excel before uploading: in Numbers, go to File > Export to.
- If an address doesn’t import correctly, edit the customer to fix it.
Editing a customer
- On the Customers page, click the dot menu for the customer and click Edit customer. You can also click the customer's name or company name to edit them (clicking their email address will trigger your browser's configured email handler).
- Make your changes
- Click Save to save your changes and stay on the page. Click Save and go back to save your changes and return to the Customers table. To discard your changes without saving, click Discard and then Discard & exit.
Sending notifications to more than one email address
Some customers want order confirmations and invoices sent to additional recipients, like a restaurant’s chef and bookkeeper. When editing a customer, add extra addresses under Email Sharing, separated by commas:
All email notifications, such as order confirmations and invoices, are sent to these addresses as well as the customer’s main email.
Disabling a customer
Disable a customer to stop them from shopping on your storefront while keeping their record.
- On the Customers page, click the dot menu for the customer
- Click Edit
- Scroll to the bottom and turn on the toggle to disable the customer
- Click Save
Disabled customers can still log into your storefront, but when they attempt to place an order they will see an error message informing them their account has been disabled.
Deleting a customer
- On the Customers page, click the dot menu for the customer
- Click Delete customer
- Click Delete to confirm
To delete several customers, select them using the checkboxes in the table and click the Delete bulk action button at the top of the table.
What happens when you delete a customer:
- Their past orders and reports stay intact
- They can’t log in, reset their password, or create a new account with the same email address
- If you’ve turned on guest checkout, they can still order as a guest. Doing so with the same email reactivates their deleted account.
Tip: To stop a customer from ordering, disable them instead of deleting them. Disabling is easier to undo and doesn’t have the guest checkout loophole.
Exporting customers
- On the Customers page, click the dot menu in the top-right corner
- Click Export customers
Your customer list downloads as a CSV file.
Other things you can do from the Customers page
- Assign customers to price lists. See Assigning customers to price lists.
- Add tags. See Customer groups & tags.
- Send account invites. See Customer accounts & login.
- Adjust store credit. See Store credit.
- Email customers or send a price list. See Emailing customers.
- Log an order for a customer. See Viewing & managing orders.
What’s next
- Customer groups & tags: organize and filter your customers
- Customer accounts & login: help customers register and log in
- Assigning customers to price lists: control who sees each price list
Need help? Contact support@localline.ca or use the in-app chat.