
Assigning a customer to a price list makes them a member of it. For private price lists, membership is what gives a customer access. Only members can view products and place orders on a private price list. Public price lists don't require membership and are accessible to anyone visiting your storefront.
This article covers when you need to assign customers, the different ways to do it, and how to handle access requests.
When you need to assign customers
- Public price lists: Anyone can shop without being assigned. Assigning customers is optional. You might still do it so a customer sees a specific public price list as one of theirs, or so you can send them your scheduled price list emails.
- Private price lists: Customers must be members to view products and order. Assign them yourself, or approve their access requests.
A customer can be a member of more than one price list. For example, a restaurant owner might buy wholesale for their business and retail for their household.
Assigning a customer when adding them
- Go to the Customers page
- Click + Add customer
- Fill in the customer’s details
- In the Price Lists Access section, check each price list the customer should be a member of
- In Preferences, check the Send account invite box to send an invitation to register, if you want them to set up a password so they can log in
- Click Save
See Adding & managing customers.
Assigning an existing customer
- On the Customers page, click the dot menu for the customer
- Click Add to price list
- Select the price list from the dropdown list
- Optionally, check the boxes for Send price list invite email if you want to send an email notification to the customer to let them know they have access, and Make their default price list if you want the customer to be directed to this price list when they log in.
- Click Save
Assigning many customers at once
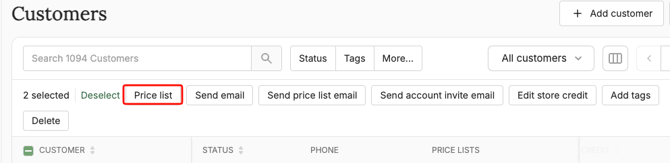
- On the Customers page, select one or more customers using the checkboxes
- Click the Price list bulk action button at the top
- Select the price list from the dropdown list
- Optionally, check the boxes for Send price list invite email if you want to send an email notification to the customer to let them know they have access, and Make their default price list if you want the customer to be directed to this price list when they log in.
- Click Save
Approving access requests for private price lists
Customers can also ask to join a private price list themselves:
- The customer visits the private price list’s URL, creates an account or logs into their existing account, and clicks Request access
- They get an email confirming their request was sent
- You get an email notifying you of the request, if the Price list membership request notification is turned on in your back office user notification settings
- Click Allow access in the email to add the customer as a member
Tip: Keep the Price list membership request notification turned on for private price lists. Otherwise, requests can go unnoticed and customers will be left waiting.
Registered and unregistered customers
To see a private price list, a customer needs to be able to log in. Customers you add yourself or import start as Unregistered. They don’t have a password and can’t log in until they complete registration.
To give an unregistered customer access:
- Assign them to the price list
- On the Customers page, select them and click the Send account invite email bulk action button
- Once they set a password, their status changes to Active and they can access the price list
Customers on more than one price list
When a customer belongs to several price lists, your default price list loads first when they log in, or the price list you have set as their default in their customer record. They can switch between the price lists they have access to from the Price Lists page in their storefront account settings.
To make it easy for customers to get to the right price list, share its URL directly (shown underneath the price list name in Price Lists), or send it from the Customers page:
- Select one or more customers
- Click Price list email
- Choose the price list, then add a subject and message
- Click Send
Removing a customer from a price list
- On the Customers page, click the dot menu for the customer
- Click Edit customer
- In the Price List Acess section, uncheck the price list
- Click Save
If the price list is private, the customer will no longer have access to that price list. Their past orders aren’t affected.
Good to know
- Duplicating a price list copies its members. Review the copy’s customers before activating it. See Creating & editing price lists.
- Disabling a customer blocks them from shopping on your storefront entirely, not just one price list. See Adding & managing customers.
What’s next
- Retail vs. wholesale pricing: set different prices for different customer groups
- Adding & managing customers: add and edit customer details
- Customer accounts & login: help customers register and log in
Need help? Contact support@localline.ca or use the in-app chat.