
Boxes let you bundle several products into one item customers can buy. They're a simple way to raise your average order size, move surplus or seasonal products, and run CSA shares or subscription boxes where contents change week to week, without creating new products each time.
This article covers how to create a box, set its price and inventory, and manage your boxes.
Creating a box
- Click Products in the side navigation
- Select Boxes
- Click Add Box in the top-right corner
Step 1: Add box info
This is what customers see on your storefront.
- Box Name (required): a short, clear name like "Weekly Veggie Box" or "Holiday Bundle"
- Vendor (optional, for food hubs): associate the box with a vendor (Note: only recommended if all the contents are from the same vendor, otherwise the vendor payouts may be incorrect)
- Keyword Tags (optional): these improve storefront filtering and search, and are shared with your other product tags
- Description: explain what's included and what customers can expect
- Images: upload up to 5 images (JPEG, JPG, or PNG, up to 1 MB each)
Step 2: Set inventory tracking
If you turn on inventory tracking, choose one of two options:
- Calculate inventory by package availability: Box availability is based on the inventory of the products inside it (Note: only the inventory of the primary product is used to calculate availability -- a box will be considered sold out even if there are swap options still available)
- Track box inventory separately: Enter a fixed number of boxes. This option also lets you set a low-inventory threshold and sold-out email notifications.
Step 3: Add contents and set the price
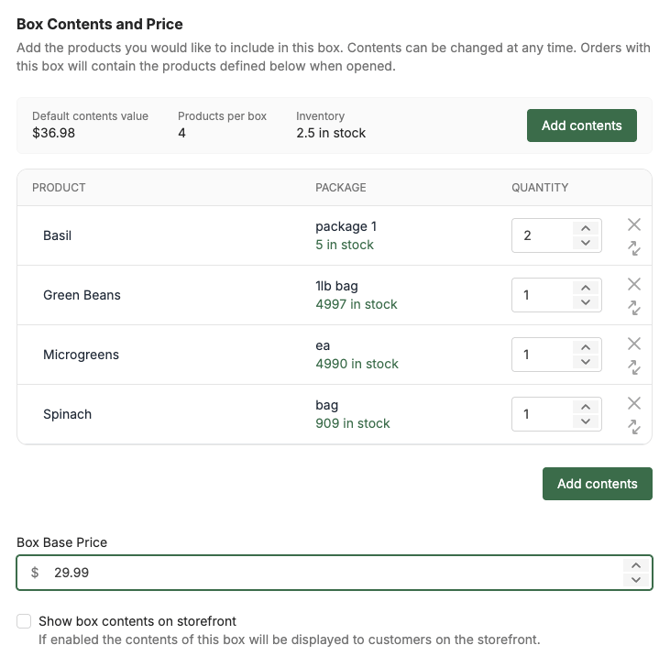
- In Box Contents and Price, click Add contents
- Click the Add button next to the packages you want to add
- Enter quantities, then click Add to box
- Enter the Box Base Price
The table shows a Cost of goods total based on each package's base price. It's for your reference only. The box price isn't calculated from it, so you set it yourself.
Turn on Show box contents on storefront if you want customers to see what's inside. If swap options have been added, contents will always be shown regardless of this setting.
Step 4: Add the box to price lists
In Add box to price lists:
- Select each price list the box should appear on
- Choose a category. Box categories are shared with product categories.
- Optionally, add a price adjustment by dollar amount or percentage (positive or negative)
- Optionally, turn on Mark as on Sale to show a sale tag, with an optional strikethrough price
- Optionally, turn on Limit per order to cap how many boxes a customer can buy in one order
- Turn on Taxable if needed, and choose Automatic or Static
Important: Tax on a box is calculated exclusively on the box price. It doesn't use the tax settings of the products inside it. See Product taxes.
Step 5: Add back office details (optional)
- Package Code: used for barcode scanning, or as an internal tracking reference
- Internal Box ID: a unique internal identifier. It also appears on some order exports.
- Internal Tags: for organizing boxes in your back office. These are shared with product internal tags.
Step 6: Set box status
- Box visibility: turn off to hide the box from your storefront without removing it from price lists
- Orders with this box require approval: turn on if you need to review or adjust orders before payment, for example to enter final weights
Important: If a product inside the box requires approval, that setting doesn't carry over. You need to turn it on for the box too.
Click Save.
Changing box contents
You can edit a box's contents at any time. Changes apply to new orders only. Orders that have already been opened keep the contents they had.
If the box is part of a subscription, update its contents before the order cutoff so the changes appear on the next round of subscription orders. See Setting up subscriptions.
Managing your boxes
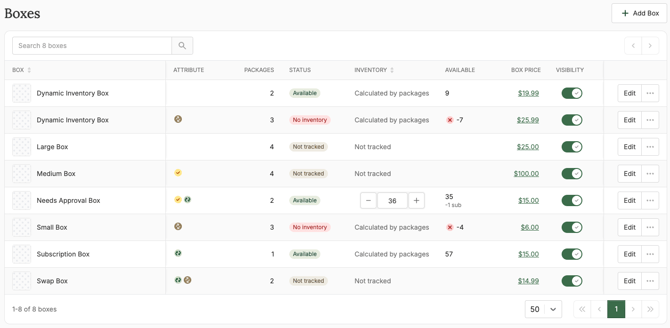
Go to Products > Boxes to see all your boxes. From the Boxes table you can:
- Check status: Available, No Inventory, Running Low, or Not Tracked
- Spot settings at a glance: A yellow check icon means the box requires approval. A green subscription icon means it's offered as a subscription on at least one price list.
- Update inventory: use Set, +, or - without opening the box
- Toggle visibility: show or hide a box on your storefront
- Edit or delete: click Edit, or use the three-dot menu to Delete Box. Deleting can't be undone.
Box swaps and subscriptions
Boxes also support two more features:
- Box swaps let customers replace items in a box with options you choose, with optional price adjustments per swap. See Box swaps.
- Subscription settings let you sell a box as a one-time purchase, a subscription, or both, per price list. See Setting up subscriptions.
Good to know for food hubs
Box contents are included in vendor payouts as long as the box itself has not been assigned to a vendor. If a box includes shared products from several vendors, each vendor still receives a shared order for their own products.
What's next
- Box swaps: let customers customize their boxes
- Setting up subscriptions: sell boxes on a recurring basis
- Generating pack lists: pack box orders accurately
Need help? Contact support@localline.ca or use the in-app chat.