
Not every customer wants every item in a box. One CSA member doesn't eat beets, another would rather have extra greens. Without swaps, those requests turn into emails, manual order edits, and sometimes cancelled subscriptions.
Box swaps let customers make those changes themselves. You choose which items in a box can be swapped and what they can be swapped for, and customers pick their options on your storefront. Pick lists, pack lists, and reports update automatically to reflect each customer's choices.
This article covers how to set up swaps, price them, and what customers see.
Before you begin
You'll need:
- A box that's already been created. See Box Builder.
- The products you want to offer as swap options, already set up in your catalog
Step 1: Add swap options
- In the Box Contents and Price section, find the product you want to make swappable
- Click the swap arrows beside it. The Add products window opens.
- Select one or more products to offer as swap options
- Click Save
- Adjust the quantity for each swap option's package
Repeat for each product in the box you want to make swappable. Products without swap options stay fixed in the box.
Note: If you have the Show box contents on storefront option turned off, the contents of the box won't be visible in the storefront until the customer adds the box to their cart. When they add the box to their cart, they’ll be prompted to customize the box.
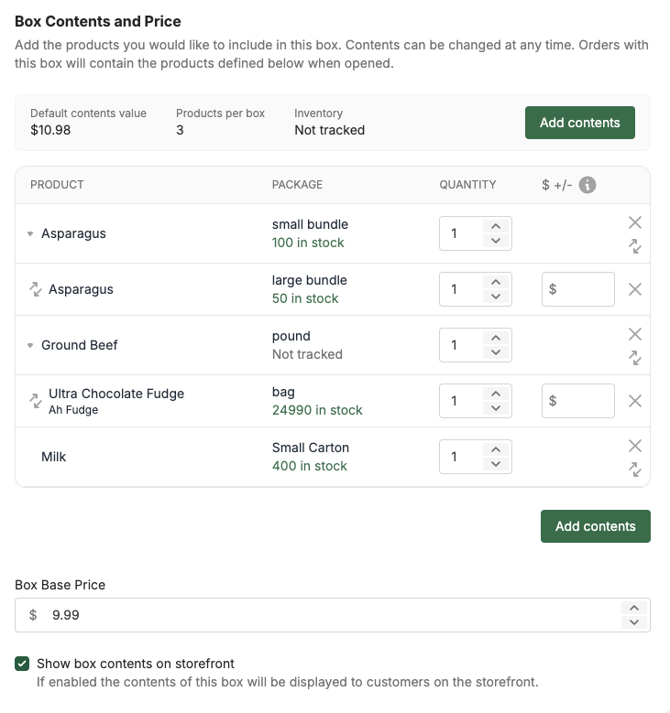
Step 2: Set price adjustments (optional)
By default, swapping doesn't change the box price. If some swap options are worth more or less than the original item, you can adjust the price:
- Find the swap option in the contents table
- Enter a positive or negative amount in the adjustment field
When a customer chooses that option, the box's total price goes up or down by that amount. For example, you might add $3.00 for swapping carrots for asparagus, or take off $1.00 for swapping to a smaller item.
Step 3: Save the box
Click Save. Swap options are live on your storefront right away.
What customers see
When a customer opens the box on your storefront:
- They see the default products included in the box, along with a Customize Contents option (only if the Show box contents on storefront option is enabled)
- Any product with swap options shows a Swap button
- Clicking Swap shows the options available for that spot in the box
- After choosing, they click Save and add to cart
If a swap option has a price adjustment, the box price updates as they choose.

Tips for setting up swaps
- Start small. Offer swaps on the two or three items customers most often ask to change. You can add more later.
- Offer options of similar value. Swaps that are roughly equal in value don't need price adjustments, which keeps things simple for customers.
- Only offer what you can supply. A swap option that's out of stock is frustrating. Use swaps for products you reliably have on hand, and review them when your availability changes.
- Refresh swap options with the season. When you update a box's contents for a new season, update its swap options at the same time.
- Tell customers about it. Mention in the box description that items can be swapped, so customers know to look for the option.
Troubleshooting
Customers can't see the Swap button. Check that visibility for the swap product is turned on, there is inventory available, and that you've added swap options to at least one product.
A swap changed the price unexpectedly. Check the adjustment field for that swap option. A positive value increases the box price and a negative value decreases it.
I need to make a swap for one customer only. You can edit box contents directly on an individual order. See Editing boxes on orders.
What's next
- Editing boxes on orders: make one-off changes to a customer's box
- Using boxes with subscriptions: offer swappable boxes on a recurring basis
- Generating pack lists: pack customized boxes accurately
Need help? Contact support@localline.ca or use the in-app chat.