
Your products are the foundation of your LocalLine store. This article covers how to add a single product, edit it later, and duplicate, hide, or delete products as your catalog changes.
If you're adding many products at once, see Bulk import & export of products instead.
Before you begin
Have the following ready for each product:- Product name and description
- Package sizes and prices (for example, a 1 lb bag and a 5 lb bag)
- Whether you'll track inventory and if you track by package or by weight, and whether you charge by package or by weight
- A product photo (square images with small file sizes load fastest)
If you want to assign the product to a price list while creating it, you'll need to create the price list first. You can also skip that step and assign products in bulk later when you build your price list.
Step 1: Start a new product
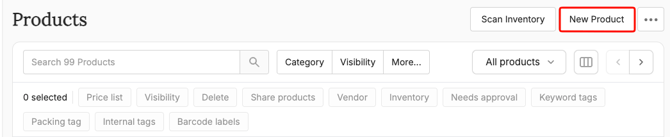
- Go to the Products page
- Click New Product
Step 2: Enter product info
In the Product info section:
- Enter a Name (required)
- If you want to assign the product to one of your managed or connected vendors, select the vendor from the drop-down. Note: Connected vendors will not receive a shared order for products that you create and assign to them, only for products that they have created themselves and shared with you.
- Add Keyword tags. These appear under the product title on your storefront and also as filters to help customers find what they're looking for.
- Write a Description. You can use bold, italics, lists, links, and emojis.
Step 3: Add images
In the Images section, drag and drop an image from your computer, or click Add images to open a file picker. For more on image best practices, see Product photos.
Step 4: Set inventory tracking
In the Track inventory section, choose whether to track inventory, and if you track inventory separately for each package or have a single shared pool of inventory for all packages of this product.
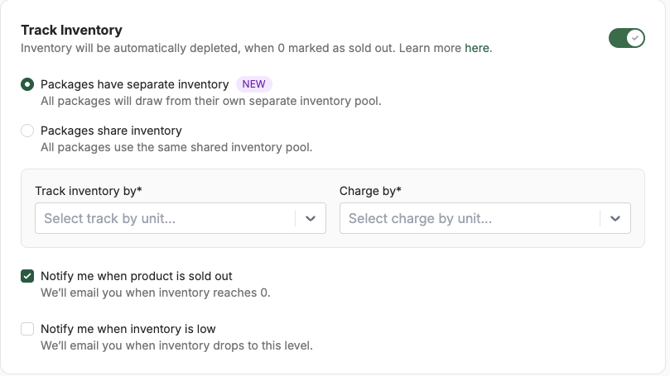 You can use any combination of track and charge by options, depending on what best fits your product and business:
- Track and charge by package
- Track and charge by weight
- Track by package, charge by weight
- Track by weight, charge by package
You'll also choose whether packages share inventory or have separate inventory. In order ot maintain consistency over time across event history, orders and reports, these options can't be changed after the product is saved. For details, see Inventory management and Selling by weight.
Step 5: Add packages
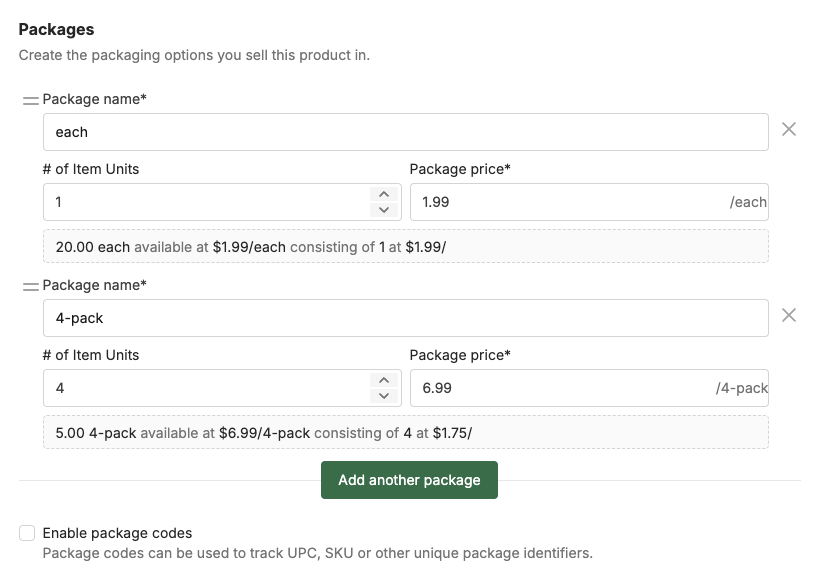
A package is the size or format customers will be ordering, such as a single bunch, a 5lb bag, or a case of 12. To add more than one:
- In the Packages section, click Add another package
- Enter the Package name, and then depending on your inventory tracking settings, specify how many units of inventory the package will require and the price per unit for shared inventory, or the price per package and amount of inventory for separate inventory.
-
You can click and drag the handles on the left to reorder how the packages will appear in your storefront
Step 6: Assign to price lists (optional)
In the Add Product to Price Lists section:
- Click the checkbox to select each price list the product should appear on. By default, all packages will automatically be selected, you can uncheck any you don't want to be added. For example, you may only want smaller package sizes on your retail price list and larger or case sizes on your wholesale price list.
- You can optionally enable the price adjustment option for each package, and apply an adjustment on top of the base price. The three options are:
- Set: Set the price of this package to the entered value
- $: Add or subtract the specified value from the base price
- %: Increase or decrease the price by a specified percentage
- For each price list, choose a category from the dropdown. If the category doesn't exist, you can click the Edit categories button to create a new one. Note that categories are not shared between price lists. Also note that you can optionally hide products that have not been assigned to a category on your price list in the price list settings, so if you have this option enabled and you don't specify a category, the product will not be visible.
- If you have the Store Credit feature on your account and you want to allow customers to purchase this product with store credit on a price list, enable the Valid for store credit option
- If you need to charge sales tax for this product on a price list, enable the Taxable option. You can then specify if you want the system to automatically calculate the sales tax rate (using the general tax rate for the fulfillment location), or manually specify a static tax rate that will always be applied. See Product taxes for more details.
Step 7: Add back office details (optional)
In Back Office Details, you can add a Product ID and Internal Tags. These fields are only visible to your and your team and can used in various places in the back office to filter and search for products.
Packing Tags are used to group products together on packing slips and pack lists. You can only assign one packing tag per product.
Step 8: Set product status and save
In Product Status:
- Turn off Product visibility if you don't want this product to appear in your storefront
- Turn on Orders with this product need approval if you need to review orders before payment is collected, for example to enter final weights. See Selling by weight for more details.
Click Save.
Editing a product
- On the Products page, click the product name, or click the Edit button
- Make your changes
- Click Save
Nearly all product details are captured on an order at the time the order was placed, so updating the product's name, price, etc. will not retroactively change any previous orders. Subscription plans are an exception and will be updated if you change the product -- however if you have overridden the product price on a subscription plan, the price will not be updated if you later edit the product and change the price.
For quick changes to inventory, price or visibility, you can also edit these directly in the Products table without opening the product, and the changes are automatically saved.
Duplicating a product
Duplicating is the fastest way to add similar products. It's also how you can change settings that are locked after a product is created, such as separate vs. shared package inventory.
- On the Products page, click the dot menu for the product
- Click Duplicate product
- Update the fields you need to change
- Click Save
Hiding vs deleting a product
- Turn off the product's visibility when it's out of season or temporarily unavailable. It stays in your catalog and price lists, ready to turn back on.
- Delete a product when you'll never sell it again. It's removed from your Products page and storefront, but stays on past orders and reports.
To delete, click the dot menu for the product, then click Delete product and confirm.